Looking to transform your bedroom into a personal haven that truly reflects your style? Unique wall painting ideas are a fantastic way to do just that, adding character, depth, and a splash of creativity to your space. These designs are gaining popularity because they allow you to showcase your personality and make a bold statement, all while giving your room a fresh, personalized look. Whether you’re into abstract art, nature-inspired murals, or geometric patterns, wall paintings open up endless possibilities for creative expression.
In this article, you’ll discover a variety of inspiring ideas to elevate your bedroom decor. From subtle accent walls to dramatic murals, there’s something for every taste and skill level. Get ready to explore innovative concepts that can turn your bedroom into a truly unique retreat. With these ideas, you’ll be empowered to refresh your space and make a lasting impression—so let your creativity run wild!
1. Ombre Wall with Soft Gradient Transitions
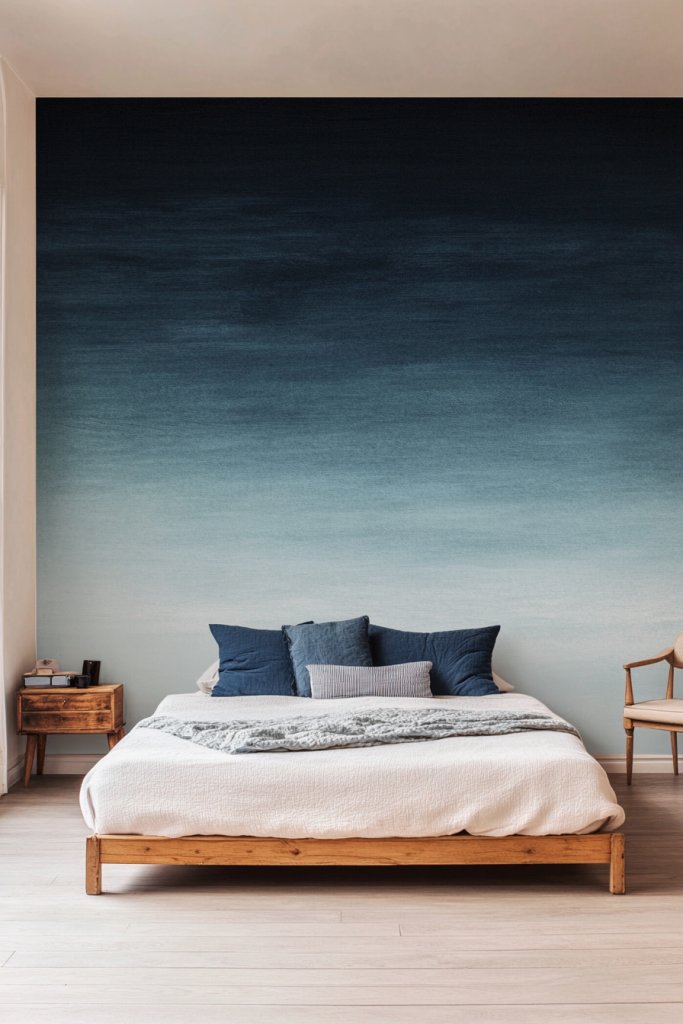
Tired of flat, lifeless walls that don’t inspire? An ombre wall offers a subtle yet stunning transformation, blending two or more shades seamlessly. It’s perfect for those who want a sophisticated, calming backdrop that adds depth without overwhelming the room. Who says your walls can’t have a little artistic flair?
Imagine a wall where the color gently fades from a deep, rich hue at the bottom to a light, airy shade at the top. The transition is so smooth, it’s almost like watching a watercolor painting come to life. The soft gradient creates a soothing atmosphere, ideal for relaxing bedrooms or cozy retreats. As you move around the room, the colors seem to shift and breathe, adding a dynamic yet tranquil vibe.
Choose colors that match your mood—deep blues and purples for calm, warm oranges and pinks for cozy vibes. For a minimalist look, stick to two shades; for a more dramatic effect, layer multiple tones. Seasonal changes can influence your palette—cool tones in winter, bright pastels in spring—keeping your space feeling fresh. You can also create vertical or horizontal gradients depending on your room’s proportions.
Start by selecting your color palette and prepping your wall with a primer. Use a sponge or a large, soft brush to blend the paints gradually, starting with your darkest hue at the base or top. Work quickly to maintain a wet edge, feathering the colors into each other with circular motions or a clean brush. For a flawless finish, consider using a spray bottle of water or glazing medium to help the transition stay smooth. Once dry, inspect and touch up any uneven spots.
Add metallic or pearl accents within your gradient for a touch of shimmer. Incorporate textured paints or matte finishes to create contrast and interest. Pair your ombre wall with neutral textiles and minimalist furniture for a chic look, or layer with patterned bedding and accessories for a boho vibe. Personal touches like a framed quote or decorative lighting can further enhance the effect.
Ombre walls prove that subtle techniques can make a bold impact. They add personality without cluttering the space, making your room feel more inviting and stylish. Dive into your favorite colors and enjoy the process—your personalized gradient wall will boost your confidence and inspire creativity in your entire home.
2. Chalkboard Wall for Creative Doodles and Messages
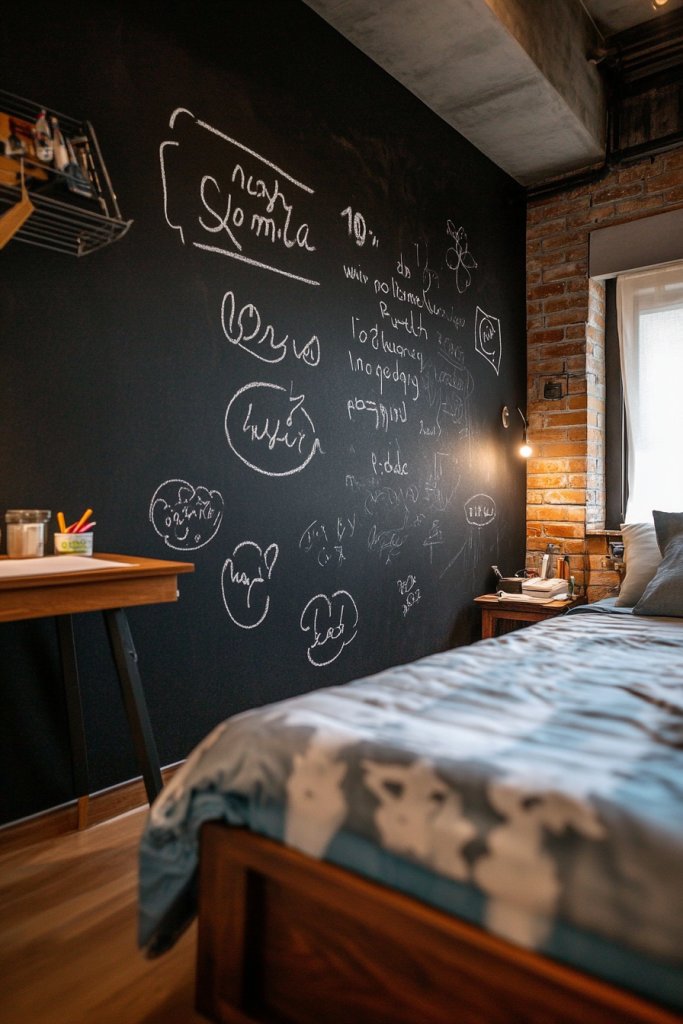
Ever wish your bedroom could be more interactive and personalized? A chalkboard wall turns a plain surface into a dynamic canvas for doodles, notes, or motivational quotes. It’s perfect for a creative outlet or a fun way to keep reminders handy. Plus, it adds a playful, ever-changing element to your decor.
Visualize a matte black or deep gray wall filled with colorful chalk drawings—flowers, quotes, or whimsical doodles. It invites you to express yourself freely, with no limits on creativity. The chalky texture contrasts beautifully with smooth, painted walls, creating a focal point that’s both functional and artistic. You can even incorporate a border or frame for a polished look.
Choose different colors of chalk to suit your mood or decor theme—pastels for softness, bold hues for vibrancy. You can make sections for daily to-dos, inspirational quotes, or seasonal themes. For a more permanent solution, consider chalkboard paint on a small section or entire wall. It adapts easily to both minimal and maximal styles, depending on how much you doodle.
Prepare your wall by cleaning and sanding if needed. Apply a few coats of chalkboard paint, following manufacturer instructions for drying times. Once dry, prime the surface with chalk and wipe it clean. Use high-quality chalk for smooth writing, and keep a variety of colors on hand. To maintain the look, clean regularly with a damp cloth—no harsh chemicals needed.
Frame the chalkboard area with decorative molding or washi tape for a tailored appearance. Incorporate small ledges or shelves nearby to hold chalk, erasers, or decorative items. Personalize with hand-lettered quotes or seasonal artwork. Over time, your chalkboard can evolve into a mini gallery of your daily life and creative moods.
A chalkboard wall encourages your artistic side and keeps your space lively. It’s a simple project that invites daily interaction, making your bedroom a more inspiring place. Don’t hold back—your creativity can truly shine, and your room will always feel fresh and fun.
3. Metallic Paint Accents for a Luxe Touch
Want to add a touch of elegance and sophistication without overhauling your entire decor? Metallic paint accents are your answer. They instantly elevate any space with a subtle shimmer, making your walls look luxe and high-end. It’s a simple trick that can turn a plain wall into a statement piece.
Imagine a wall where a bold stripe or border gleams with gold, silver, or copper. The reflective quality catches the light, adding depth and brightness to your room. You can highlight architectural features like molding or corners, or create a pattern that plays with light and shadow. It’s like giving your room a jewelry upgrade, but way more subtle and stylish.
Use metallic paints sparingly for accents—think borders, geometric shapes, or a single feature wall. Mix matte and gloss finishes for an added layer of texture. This technique works well in modern, glam, or industrial styles. Seasonal adjustments include swapping out metallic shades—warm tones for fall, cool for winter—to keep your decor fresh.
Choose high-quality metallic paints designed for interior use. Use painter’s tape to create clean lines or geometric designs. Apply with a foam roller for smooth coverage or a fine brush for detailed work. Work in thin coats to prevent streaks, and allow ample drying time between layers. For a more dramatic effect, layer different metallic shades or add a clear topcoat for extra shine.
Combine metallic accents with textured wall finishes or layered paint techniques for richness. Add decorative moldings or architectural trims painted in metallic for a regal look. Pair with plush textiles and mirrored accessories to amplify the luxe effect. Personalize by selecting shades that reflect your personality—rose gold for romantic, silver for sleek, bronze for earthy tones.
Metallic paint accents prove that small details have big impact. They instantly boost your room’s style quotient and make your space feel curated. Experiment with different designs and watch your walls transform into elegant focal points that reflect your unique taste.
4. Stenciled Floral or Geometric Motifs for Repetitive Elegance
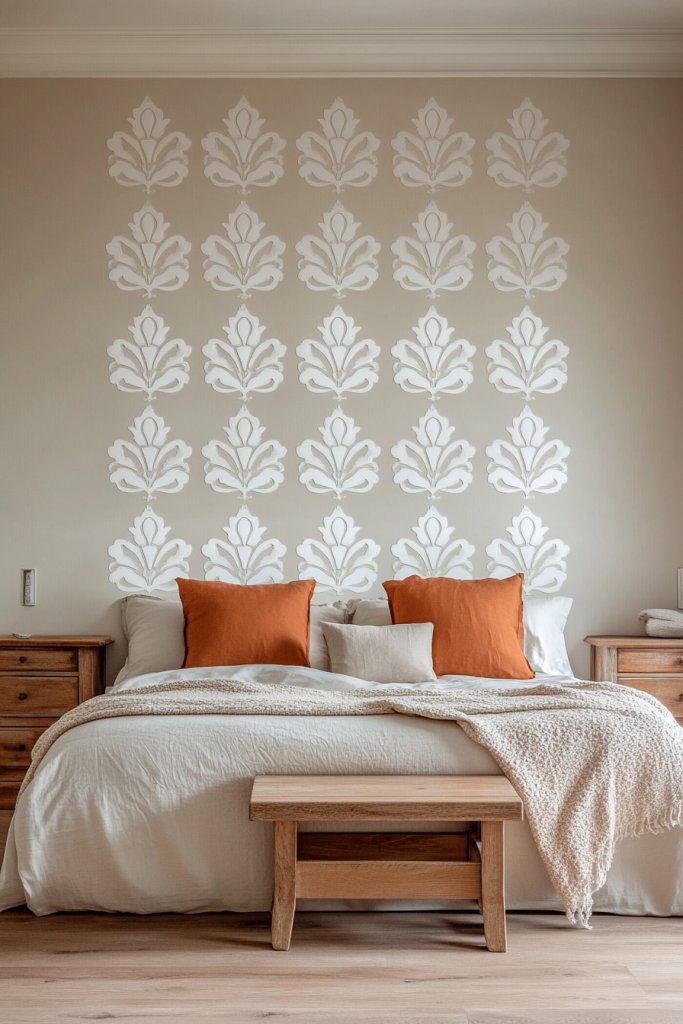
Want to add intricate detail without hiring a pro or risking uneven freehand designs? Stenciling allows you to craft beautiful floral or geometric motifs with ease and precision. It’s a fantastic way to elevate your walls with a touch of elegance and craftsmanship. Plus, it’s a fun DIY project that doesn’t require artistic talent—just patience.
Visualize a wall adorned with repeating floral patterns or geometric shapes, arranged symmetrically or randomly. The motifs can be delicate and detailed or bold and abstract, depending on your style. Use contrasting colors to make the patterns stand out or soft shades for a subtle effect. Repetition creates rhythm and harmony, turning your wall into a piece of art.
Mix and match motifs—combine florals with geometric borders, or vary sizes and colors. For a vintage vibe, opt for ornate, detailed stencils; for modern decor, choose clean, simple shapes. You can stencil entire walls or create a feature strip or headboard accent. Seasonal variations include using metallic paints or glitter for special occasions.
Begin by selecting your stencil design and securing it flat against the wall with painter’s tape. Use a stencil brush or sponge with minimal paint to avoid bleeding. Dab gently to fill in the pattern, working systematically to cover the area evenly. Clean your tools frequently and rotate colors as needed. Seal the design with a clear varnish for durability.
Personalize your motifs by adding hand-painted details or mixing different stencil patterns for a custom look. Frame certain sections or add decorative borders to frame your designs. Use metallic or luminous paints to make motifs pop at night. Incorporate your favorite colors to match your decor and personality.
Stenciling proves that precision and patience can create stunning results without artistic mastery. It enables you to craft intricate, elegant details that elevate your entire room. With a little practice, your walls will look professionally decorated, boosting your confidence in DIY decor.
5. Abstract Splash and Drip Art for a Contemporary Edge
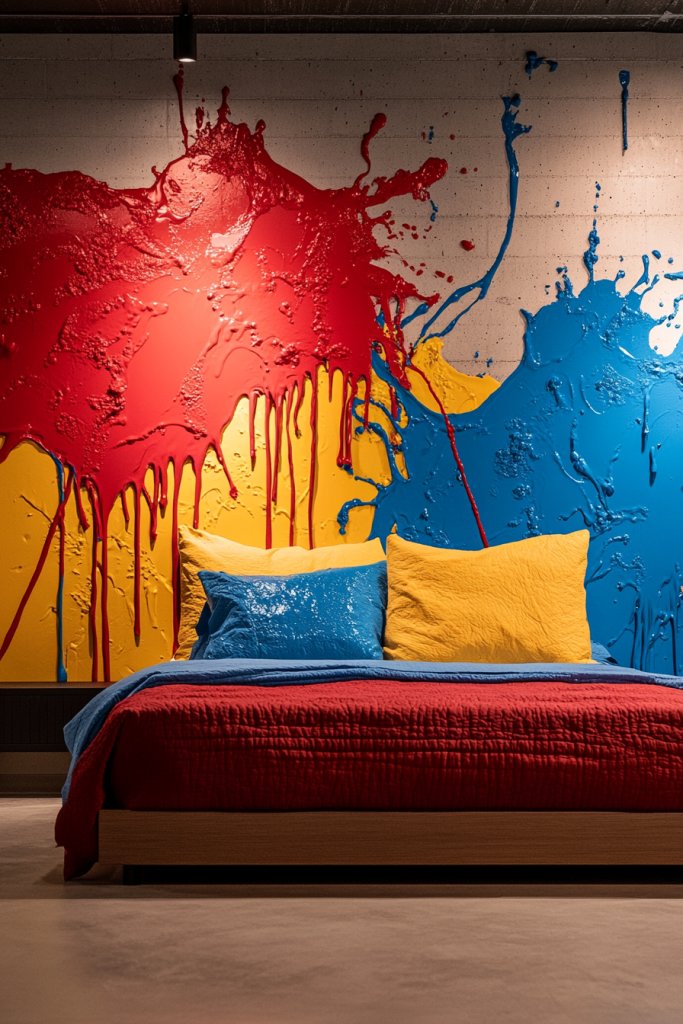
Craving a modern, energetic vibe that screams creativity? Abstract splash and drip art bring bold, spontaneous design to your walls. They’re perfect for breaking traditional decor rules and expressing your personal style. Plus, they’re surprisingly easy—no artistic skill required, just a willingness to get a little messy.
Picture walls covered in vibrant colors dripping down or splashing across in unpredictable patterns. The random nature of this art creates a sense of movement and chaos, which actually looks very intentional and stylish. Use bold hues like reds, blues, and yellows or stick to monochrome for a more subtle, sophisticated aesthetic. The result is a lively, contemporary statement that energizes your space.
Adjust the scale and density of splashes—small, concentrated spots for a refined look or large, wild spills for maximum impact. Incorporate metallic or neon paints for extra flair or keep it classic with black and white. This technique pairs well with minimalist furniture, making the wall the main attraction. You can also layer multiple colors for complex, textured effects.
Start with a primed wall and plan your color palette. Use acrylic or latex paints, loaded onto brushes or spatulas, and flick or drip onto the surface. Protect surrounding areas with drop cloths—this gets messy fast! Work in sections, allowing each splash to dry before adding more. For precision, use stencils or masking tape to contain areas or create shapes.
Add metallic or glow-in-the-dark paints for a surprise element at night. Incorporate textured mediums into your splashes for a three-dimensional effect. Frame the most striking areas or add LED strips nearby for an extra modern touch. Your spontaneous art can become a signature style—embrace the chaos.
Abstract splash and drip art remind us that imperfection can be beautiful. It’s a bold, expressive style that invites experimentation and fun. Once you see your walls come alive with energy, you’ll feel empowered to explore more creative projects in your home.
6. DIY Tape-Resist Art with Contrasting Colors
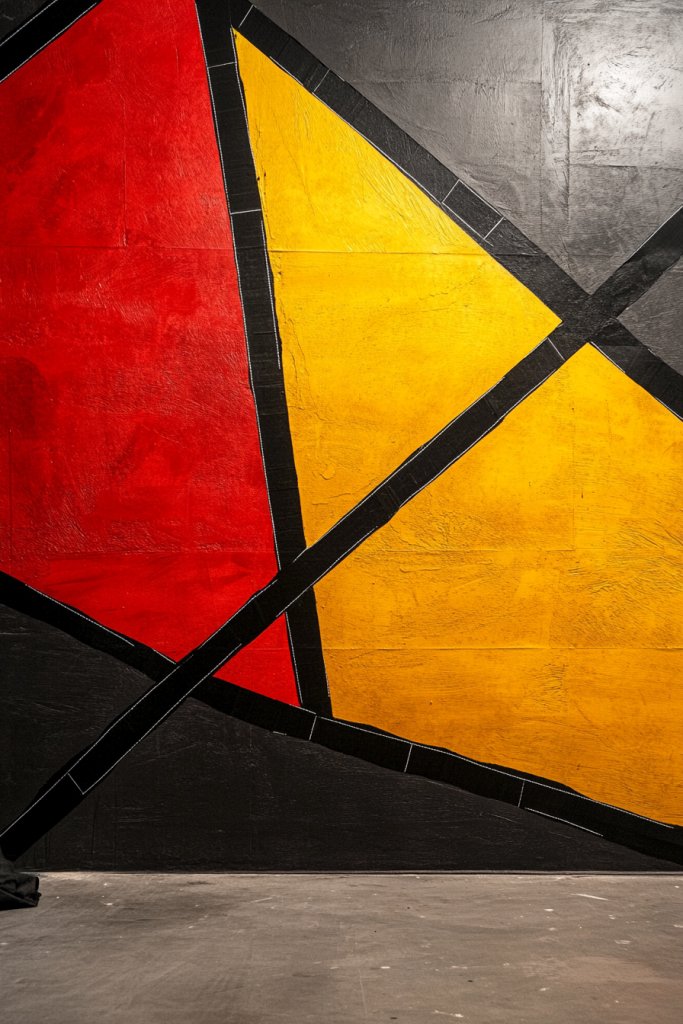
Want a striking, artistic wall without the hassle of complex painting techniques? Tape-resist art is your DIY ticket. It creates bold, graphic designs by blocking out areas with tape and painting around them. The result? Crisp, eye-catching patterns that look professionally done—no experience needed.
Picture a wall with sharp, geometric shapes in contrasting colors—black and white, bright and dark, or metallic and matte. The tape acts as a barrier, keeping edges perfectly clean and sharp. When you peel off the tape, the underlying wall reveals a high-contrast, modern masterpiece. This technique lends a graphic, contemporary feel to your space.
Experiment with different shapes—triangles, circles, or abstract forms—for a personalized touch. Use metallic or neon paints inside the taped areas for extra pop. It works well in eclectic, modern, or minimalist decor. You can create a single feature wall or a series of smaller designs for variety. Change the shapes or colors seasonally to keep things fresh.
Plan your design carefully and sketch it lightly on the wall. Tape off your shapes, pressing edges firmly for a clean line. Use high-quality, vivid paints and apply in thin coats, letting each dry fully. Carefully peel back the tape while the paint is still slightly damp for sharp edges. Touch up any imperfections with a fine brush. Seal your design with a clear coat to prevent chipping.
Add metallic or glitter accents within your shapes for extra interest. Integrate text or symbols with stencils for a personal touch. Pair the artwork with minimalist furniture and bold accessories. Personalize the color palette to match your mood or season, making your wall a true reflection of you.
Tape-resist art shows that you can create high-impact decor with simple tools. It’s a fun, rewarding process that results in a professional-looking piece. Once completed, you’ll feel empowered to experiment further and customize your home with bold, graphic art.
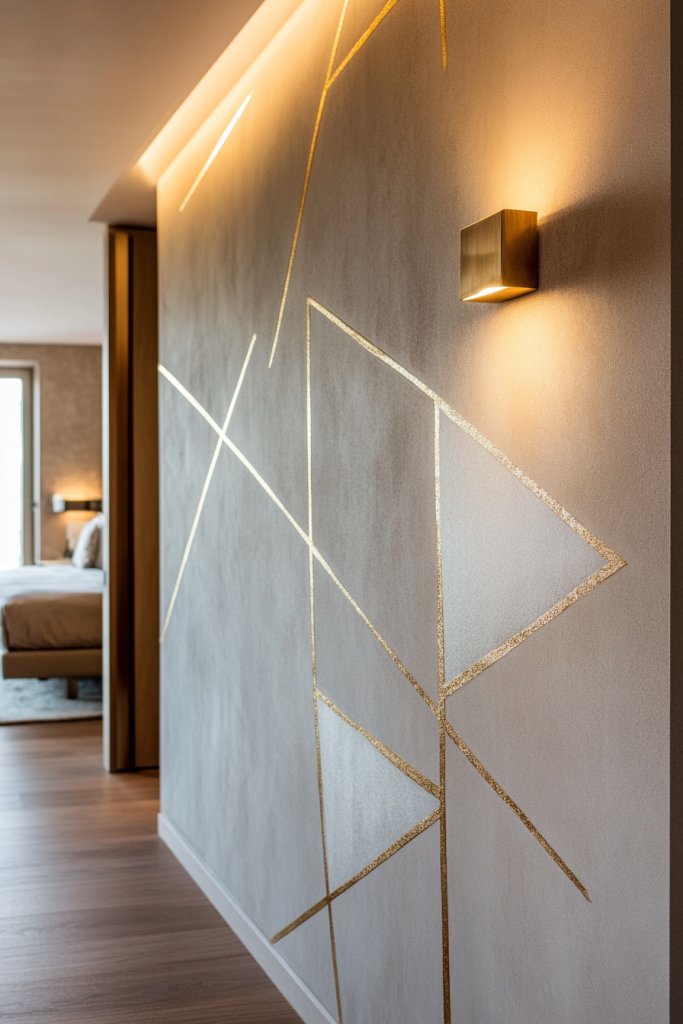
7. Minimalist Line Art with Black or Metallic Finishes
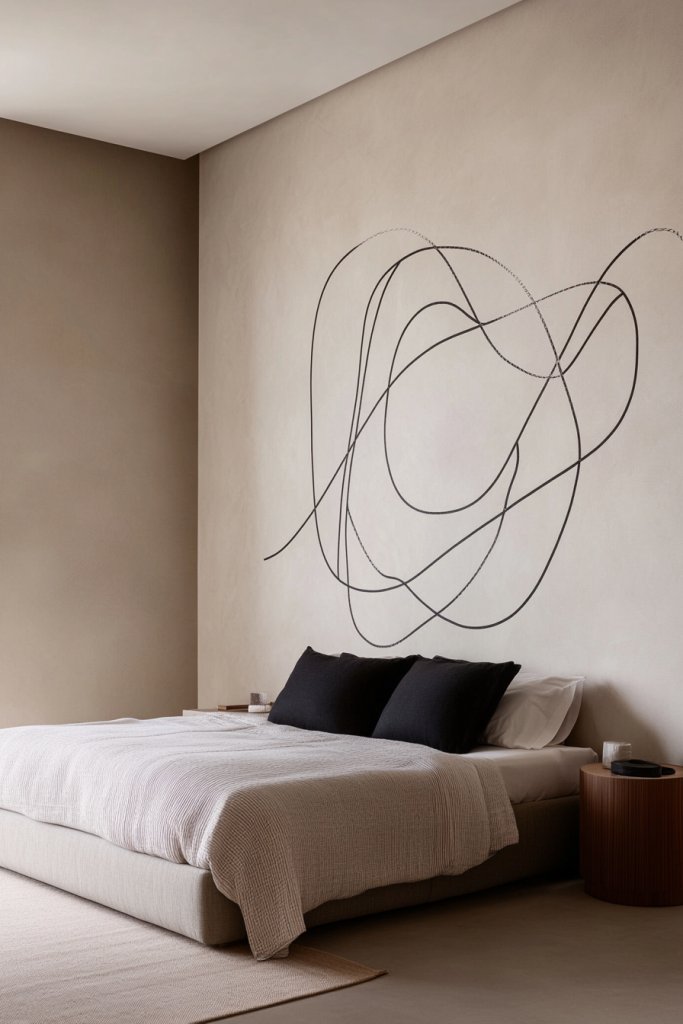
Craving a sleek, modern look that’s also easy to execute? Minimalist line art is the perfect solution. Simple, elegant, and understated, it adds a touch of sophistication without clutter. It’s ideal for a contemporary bedroom that values clean lines and subtle details.
Visualize a wall adorned with a single, continuous black or metallic line forming abstract shapes or delicate figures. The contrast against a neutral background makes the design pop while maintaining a refined aesthetic. The thin, continuous lines create a sense of movement and flow, evoking a sense of calm and clarity. The simplicity emphasizes your taste for minimalist elegance.
Opt for monochrome or metallic finishes—silver, gold, or bronze—for a luxurious touch. You can choose to paint a single large piece or a series of small, interconnected designs. Pair with plain furniture and subdued textiles to let the art stand out, or add a splash of color for a personalized twist.
Sketch your design lightly with a pencil or use painter’s tape as guides. Use a fine-tipped brush or paint pen for precision, applying the color in one continuous stroke. For metallic finishes, choose high-quality metallic paints or leafing techniques for extra shine. Keep your hand steady and work slowly, especially on curves and delicate parts. Seal with a clear varnish if desired.
Add small accents like dots or subtle geometric shapes to complement the line art. Frame the finished piece with a sleek border or leave it floating for a more modern look. Incorporate your favorite metallic shades or even color-blocked backgrounds for contrast. This art form can evolve over time, so feel free to add new elements.
Line art demonstrates that simplicity can be powerful and stylish. It allows your personality to shine through with minimal effort. Mastering this technique boosts your confidence in creating sophisticated, custom decor pieces that elevate your entire space.
8. Color Blocking with Large, Soft Edges for a Calm Atmosphere
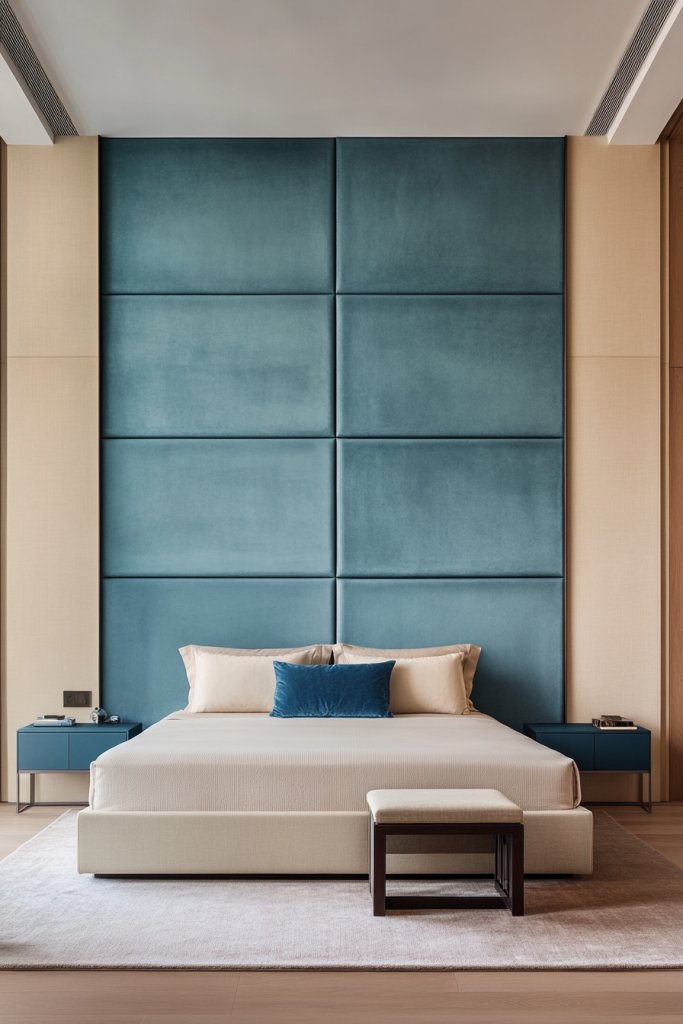
Looking for a way to bring calm and structure to your bedroom? Color blocking with large, soft edges creates a peaceful, modern aesthetic that’s both bold and soothing. It’s a technique that offers clarity without harsh lines, perfect for a restful retreat. Plus, it’s surprisingly simple to implement.
Imagine large, overlapping color patches with gently blended edges that seem to melt into each other. Soft shades like pastel pinks, blues, or earthy tones evoke tranquility and balance. The large blocks define the space without overwhelming, creating a harmonious visual flow. The subtle blending softens the transition, making the room feel cozy and unified.
Choose a palette that complements your decor—muted neutrals for a minimalist vibe or gentle hues for a romantic feel. You can create asymmetrical shapes or layered blocks for more visual interest. Seasonal changes could include swapping out colors or adding textured paints to enhance the tactile experience. This approach adapts easily to small or large walls.
Start by sketching your design with light pencil or chalk. Use painter’s tape to mask large areas, applying soft, feathered edges with a sponge or dry brush for blending. Paint in thin, even coats, allowing each layer to dry before removing the tape. To achieve soft edges, gently feather the paint with a dry brush or sponge while still wet. Finish with a matte or satin topcoat for a smooth, refined look.
Incorporate textured paints or metallic accents within your blocks for added richness. Layer different shades of the same color to build depth. Pair with layered textiles and simple furniture to keep the focus on the color blocks. You can also add subtle patterns or motifs within the blocks for extra detail.
Color blocking with soft edges shows that bold design can be gentle and calming. It encourages experimentation with color and form, boosting your confidence in creating personalized, stylish spaces. Your room will feel balanced, serene, and uniquely yours.
9. Vintage-Inspired Faux Wood or Brick Effects
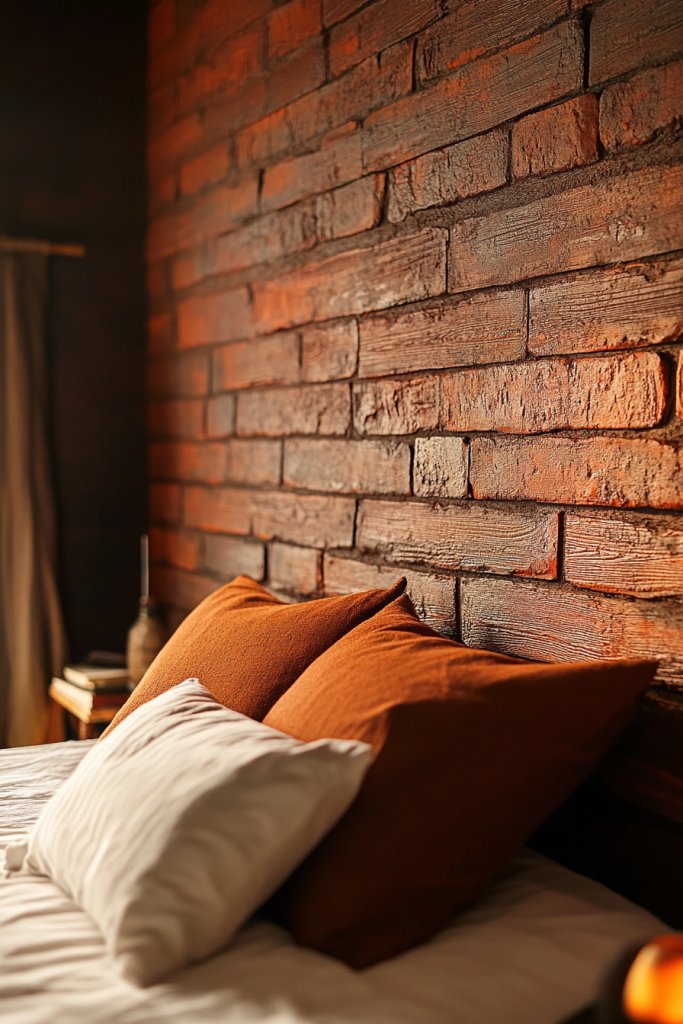
Craving that rustic, warm vibe but don’t want the hassle of real wood or brick? Faux effects are your answer! With some clever painting techniques, you can mimic the charm of vintage materials and add instant character to your walls. It’s a budget-friendly way to bring warmth and texture into your space.
Imagine a wall that looks like weathered wood planks or exposed brick, complete with knots, grain, or mortar lines—all painted freehand or with stencils. The textures add depth, making the wall feel like an architectural feature. The faux finish creates a cozy, inviting atmosphere, perfect for a bedroom that feels lived-in and loved.
Choose warm, earthy tones like browns, grays, or reds to enhance the vintage look. For a more modern twist, combine faux wood with sleek, painted sections or metallic accents. This effect pairs well with shiplap, reclaimed furniture, or vintage accessories. Seasonal updates might include darker, richer hues or distressed finishes to suit your evolving style.
Start by painting a base coat that resembles aged plaster or weathered wood. Use a dry brush or sponge to add grain and knots, blending darker shades into lighter ones for a realistic look. For brick, create a grid pattern with painter’s tape, then sponge or brush in varying shades of red, brown, or gray. Add weathering effects with watered-down paint or a stippling brush. Seal with a matte varnish for durability.
Incorporate metallic or charcoal accents for a vintage-industrial feel. Use a stencil to add subtle details like distressed edges or graffiti for an urban touch. Pair with vintage textiles, distressed furniture, or wrought iron accents to complete the look. Personalize by varying the shades and textures for a truly unique, aged effect.
Faux wood and brick effects demonstrate that you can craft authentic-looking materials with just paint and patience. They add instant warmth and texture, transforming your space into a cozy retreat. Embrace the process, and you’ll gain confidence in your DIY skills and interior style.
10. Dot Mandala or Circular Patterns for Symmetry and Focus
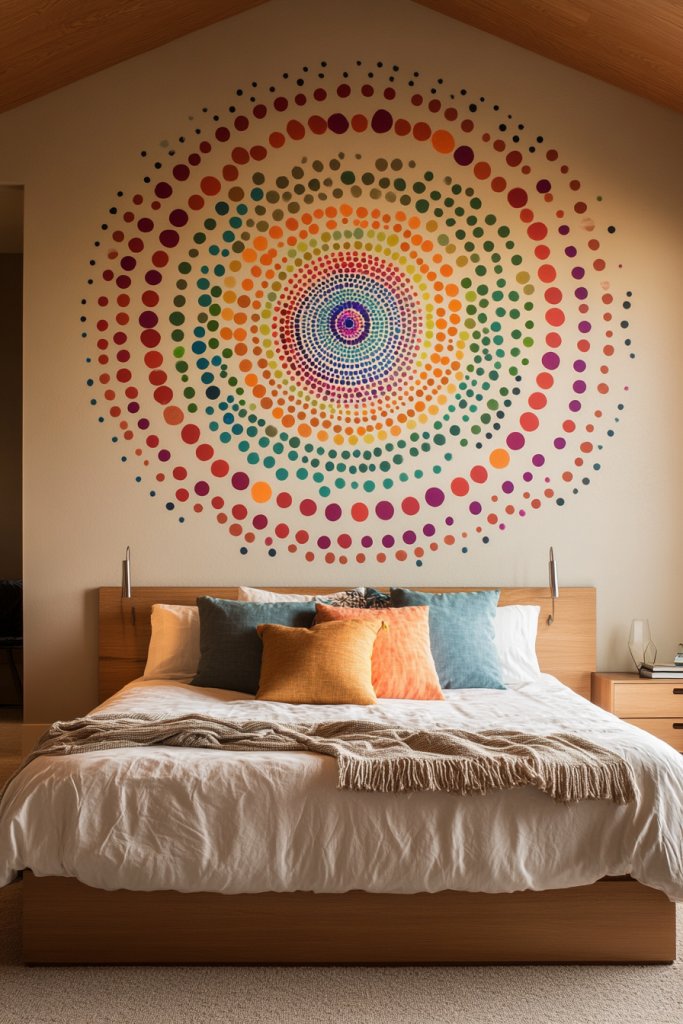
Looking for a calming, meditative focal point in your bedroom? Dot mandala and circular patterns bring harmony and balance, creating a sense of serenity. These symmetrical designs are both decorative and soothing, perfect for a space meant for rest and reflection. Plus, they’re surprisingly easy to DIY with a little patience.
Picture concentric circles or intricate mandalas radiating from a central point, filled with tiny dots or geometric shapes. Use contrasting colors—like white on a dark background—or a monochrome palette for subtle elegance. The repetitive nature of these patterns promotes tranquility and mindfulness, making your wall a visual centerpiece that invites calm.
Adapt the complexity of your mandala based on your skill—simple concentric circles or elaborate, multi-layered designs. Incorporate metallic or luminous paints for a subtle shimmer or glow-in-the-dark accents for night-time interest. You can also vary the size, placing a large mandala as a focal point or creating a series of smaller patterns for rhythm and movement.
Start by sketching your design lightly with a pencil or using a stencil. Use dotting tools, small brushes, or even the end of a paintbrush to create uniform dots. Build the design outward from the center, working symmetrically. Use contrasting colors for impact, and layer dots for texture. Seal with a clear varnish to protect your artwork.
Add metallic or luminous accents within your pattern for extra shimmer. Incorporate meaningful symbols or initials to make it personal. Frame or mount your mandala on a textured or painted background for additional depth. Personal touches turn a simple pattern into a meaningful art piece.
Dot mandalas show that patience and attention to detail create stunning results. They promote mindfulness and self-expression, making your wall a calming, artistic anchor. Once finished, you’ll feel a sense of achievement and pride in your handcrafted decor.
11. UV or Glow-in-the-Dark Paint for Nighttime Magical Effects
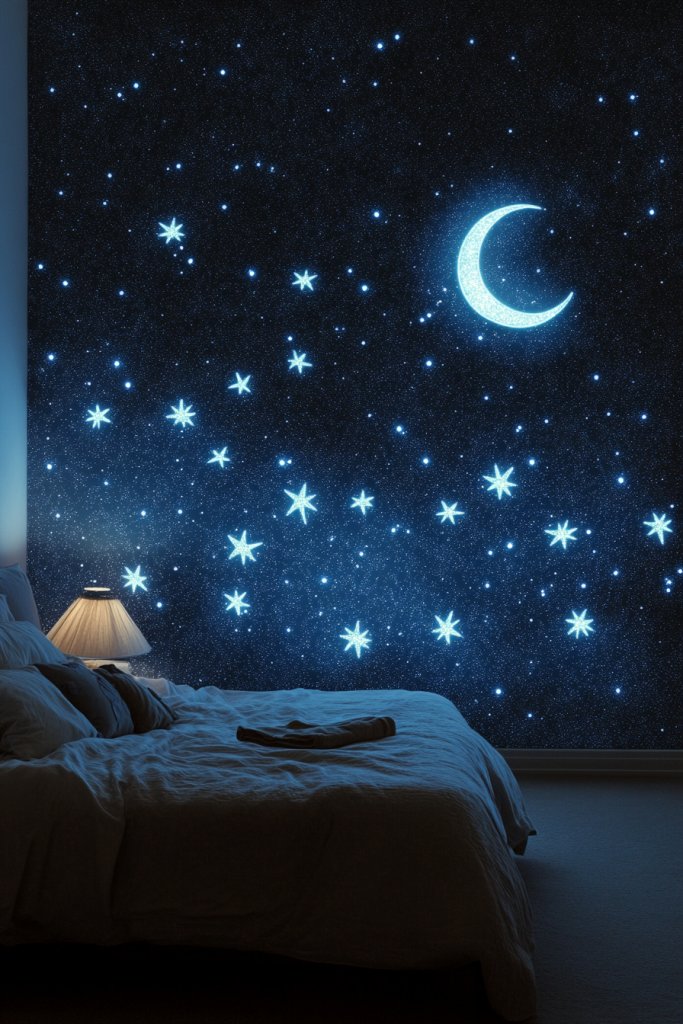
Ever wanted a bedroom that transforms at night into a magical wonderland? Glow-in-the-dark or UV reactive paints give you that mystical effect, creating a space that’s fun and enchanting after sunset. It’s perfect for kids, teens, or anyone young at heart who loves a little whimsy. Plus, it’s a conversation starter for sure.
Imagine a dark room with glowing stars, planets, or abstract shapes shimmering softly on your walls. The glow intensifies in the dark, revealing hidden patterns or messages. Use them to create a night sky scene or subtle accents that only appear when the lights go out. The effect adds a playful, dreamy layer to your decor.
Choose designs that suit your style—cosmic scenes, abstract splashes, or geometric shapes. Layer glow-in-the-dark paints over a base color for contrast, or create full murals for a dramatic impact. These effects work well in playful or eclectic decor and can be combined with other lighting for maximum effect. Seasonal updates include adding festive shapes or symbols.
Start with a dark or neutral base wall. Use high-quality glow-in-the-dark paint, applying it with small brushes or sponges for detailed designs. For UV reactive paints, use under black or UV lighting to reveal hidden details. Apply multiple thin coats for brightness, and allow proper drying time. Seal with a clear, matte finish for longevity—avoid glossy topcoats as they diminish glow.
Create themed murals—stars and moons, animals, or abstract patterns—that reflect your personality. Combine with glow-in-the-dark decals or accessories for extra fun. Use it for a nighttime reading nook or a relaxing meditation corner. Personal touches make your space uniquely magical.
Glow effects turn your bedroom into a fun, interactive space that evolves with your imagination. They inspire creativity and add a layer of enchantment that’s perfect for unwinding. Once you see your walls glow, you’ll be inspired to explore more playful decor ideas.
12. Textured Geometric Tape Art with Metallic Finishes

Want to add a modern, tactile element to your bedroom walls that’s both stylish and unique? Textured geometric tape art with metallic finishes combines clean lines with visual and physical depth. It’s an eye-catching way to elevate your decor and impress guests without a lot of fuss. Who said walls have to be flat?
Visualize sharp, geometric shapes with a raised, textured surface, finished with a shimmering metallic sheen. The combination of texture and shine creates a layered effect that catches light from different angles. The pattern can be minimalist or complex, depending on your taste, transforming your wall into a sculptural focal point that’s both modern and luxurious.
Use metallic tapes or paints in gold, silver, or bronze to match your style—sleek and modern or warm and vintage. Combine different shapes or layer tapes to add complexity. This technique pairs well with simple furniture and neutral textiles, allowing the wall to be the star. Seasonal variations include switching out colors or adding matte or gloss finishes.
Sketch your pattern lightly on the wall. Apply textured tape carefully, pressing edges firmly to prevent lifting. Use a metallic or gloss paint for finishing, applying with a brush or roller for even coverage. For added texture, you can embed materials like fabric or textured paper behind the tape before sealing. Seal the design with a clear topcoat to protect and enhance the metallic sheen.
Add small embellishments like embedded crystals or metallic leafing for extra richness. Incorporate your favorite shapes—triangles, hexagons, or abstract forms—for a personalized touch. Coordinate the metallic finishes with your decor accents—frames, hardware, or accessories—to create harmony. This approach makes your wall a true statement piece.
Textured geometric tape art with metallic finishes shows that bold, contemporary design can be crafted easily at home. It’s a statement of confidence and creativity, inspiring you to experiment further. Your room will feel polished, modern, and uniquely yours.
13. Personalized Name or Quote Hand Lettered as Wall Art
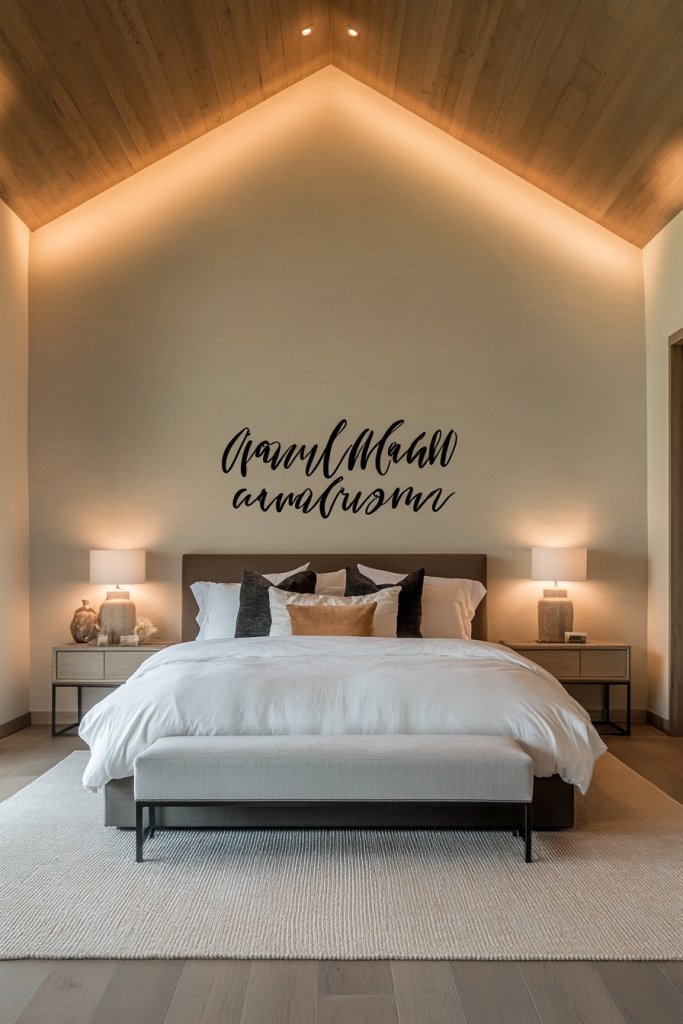
Ever wanted your bedroom to truly reflect your personality and motivation? Hand-lettered names or quotes make a bold, personal statement. They add warmth, inspiration, and a touch of your own handwriting to the decor. Plus, it’s a fun DIY project that’s highly customizable.
Picture a large, beautifully crafted quote or your name in elegant script, painted directly on your wall. Use contrasting colors—like white on a dark wall or metallic on a soft background—to make it pop. Incorporate decorative flourishes or banners to add visual interest. The result is a focal point that’s both meaningful and stylish, anchoring your room’s personality.
Choose fonts that match your vibe—sleek modern, handwritten, or vintage-inspired. You can create a single large quote or multiple smaller words arranged artistically. Experiment with colors, metallic finishes, or textured paints to add depth. This style fits well in minimalist, boho, or eclectic decor, and can be updated seasonally or as your mood changes.
Start by sketching your design with light pencil or using stencils for precision. Use a high-quality paint pen or fine brush to trace your lettering, applying multiple thin coats for solid color. Practice on paper first to perfect your style. For a more permanent look, seal with a clear protective finish. Take your time—hand lettering is all about patience and detail.
Add decorative elements like floral accents, banners, or icons around your quote. Incorporate metallic or glitter paints for added sparkle. Frame or mount your quote with decorative trim or mounting hardware for a polished appearance. Personal touches make your wall a daily source of motivation and pride.
Hand lettering your own words shows off your creativity and confidence. It’s a meaningful way to make your space truly yours and inspire you daily. Once you see your personalized quote on the wall, you’ll feel empowered to explore even more creative DIY projects.
Conclusion
These diverse wall painting ideas offer a perfect mix of bold statements and subtle touches, inspiring you to create a bedroom that’s uniquely yours. Whether you choose a vibrant mural or a delicate pattern, these ideas encourage you to bring your vision to life and infuse your space with personality. Don’t hesitate to try these techniques and transform your bedroom into a stunning sanctuary. Your dream walls are just a brushstroke away—start creating today!
Leave a Reply