Have you ever dreamed of transforming your outdoor space into a cozy, personal retreat without breaking the bank? DIY pergolas are quickly becoming a favorite choice for homeowners seeking affordable, customizable, and stylish ways to elevate their gardens and patios. Not only do they add charm and character, but building your own pergola allows you to tailor every detail to match your aesthetic and outdoor needs—making it a truly unique haven.
In this article, you’ll find a treasure trove of inspiration and practical ideas to help you craft the perfect outdoor sanctuary. From enchanting lighting setups to eco-friendly reclaimed wood designs, modern minimalism to lush greenery, and cozy seating nooks to functional cooking stations—there’s something here for every style and skill level. Get ready to explore creative projects that will turn your yard into an inviting outdoor retreat you’ll love spending time in!
1. String Light Canopy for a Warm, Inviting Glow
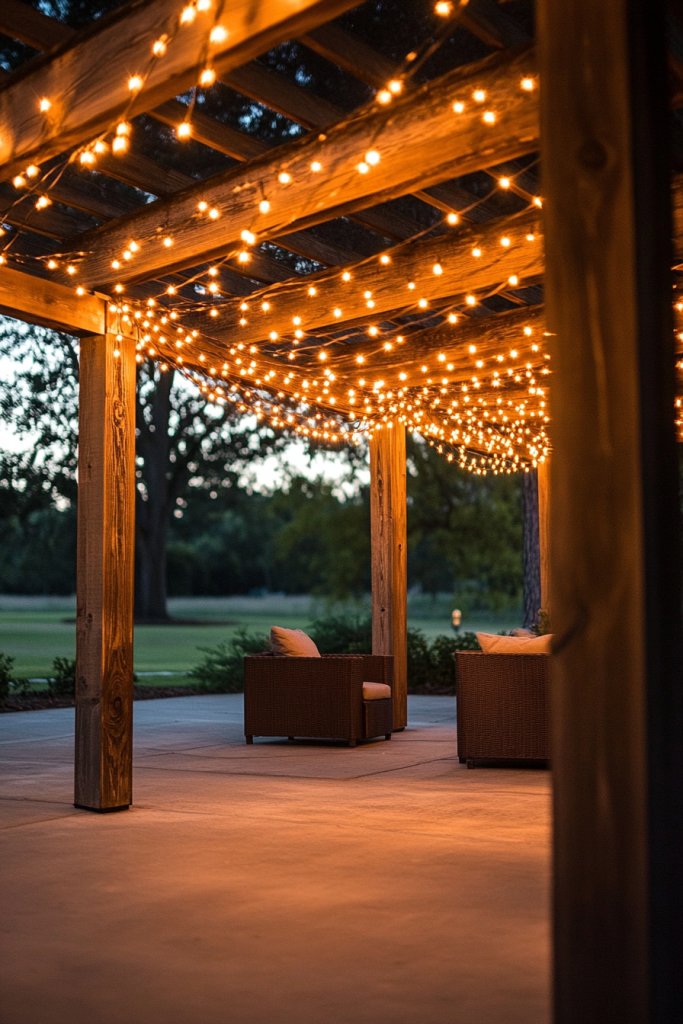
Transform your pergola into a magical evening retreat with a string light canopy that bathes the space in a soft, warm glow. This simple yet impactful addition creates a cozy, romantic atmosphere perfect for relaxing nights or intimate gatherings.
The twinkling lights add a sense of enchantment, making your outdoor area feel like a fairy tale setting. Imagine draping delicate, clear or warm-white string lights across the beams of your pergola, creating a canopy that glows gently overhead.
The lights can be hung in a crisscross pattern or loosely strung for a more relaxed look. The warm hue of the bulbs complements natural wood tones or modern finishes, while the subtle flicker enhances the ambiance.
As dusk falls, the space transforms into a welcoming haven, with the gentle hum of the lights adding a calming auditory layer. This setup invites conversation and relaxation, perfect for unwinding after a busy day.
Getting started is straightforward: choose weatherproof LED string lights—preferably with dimmable features for versatility—and measure the length needed to span your beams comfortably. Use sturdy hooks or zip ties to attach the lights securely, ensuring they hang evenly without sagging.
For a DIY touch, you can create a canopy by grouping several strands and attaching them at multiple points, or opt for vintage-style Edison bulbs for an extra nostalgic vibe. No electrical expertise is necessary; just ensure your power source is weatherproof and accessible nearby for safe installation.
2. Rustic Reclaimed Wood Pergola Frame
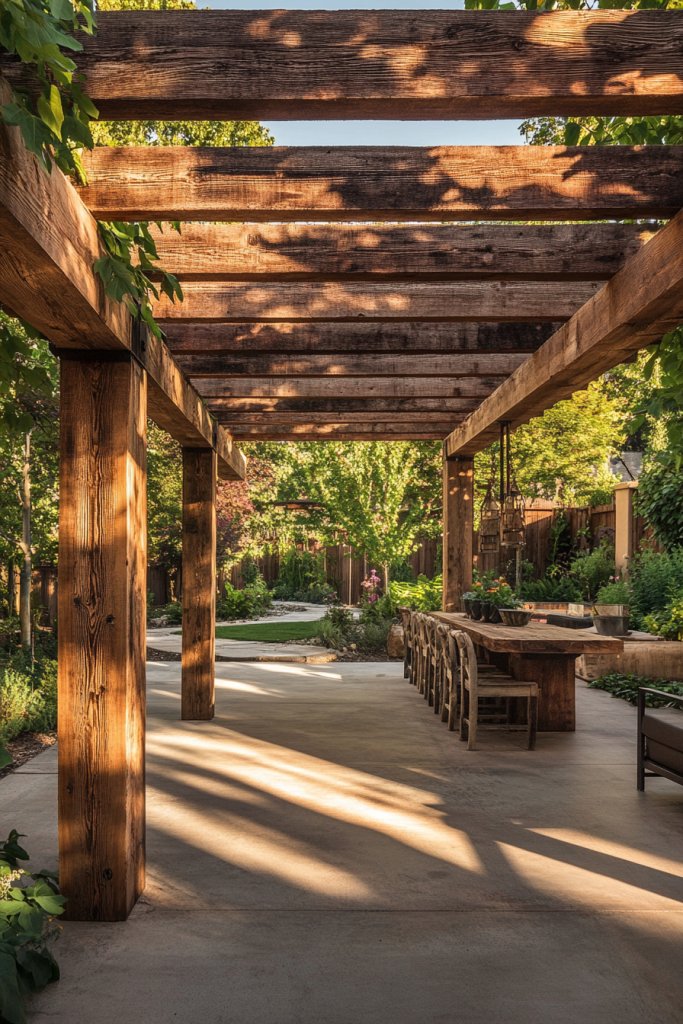
Building a rustic reclaimed wood pergola brings timeless charm and eco-conscious style to your outdoor space. This design emphasizes natural textures, weathered finishes, and handcrafted appeal, creating a cozy retreat that feels both inviting and sustainable.
It’s perfect for those who love a country or farmhouse aesthetic with a touch of history. Visualize a sturdy frame constructed from reclaimed timber—rough-hewn beams with visible knots, grain, and a patina that tells stories of their previous life.
The posts are thick and solid, anchoring the structure firmly into the ground, while crossbeams and rafters form a lattice that filters sunlight. The wood’s aged appearance pairs beautifully with hanging lanterns, potted herbs, or vintage accessories, adding layers of texture and warmth.
The overall effect is a charming, slightly imperfect look that exudes natural elegance, blending seamlessly with garden landscapes or cottage gardens. To create this pergola, start by sourcing reclaimed wood—this can be found at salvage yards, online marketplaces, or local contractors.
Measure and plan your structure based on your available space, then cut and assemble the frame using weather-resistant hardware like galvanized bolts and screws. For beginners, pre-cut kits or tutorials on basic woodworking can simplify the process.
Finish with a protective sealant if desired, but embrace the weathered finish for maximum rustic charm. This project combines sustainability with craftsmanship, resulting in a durable, eye-catching focal point.
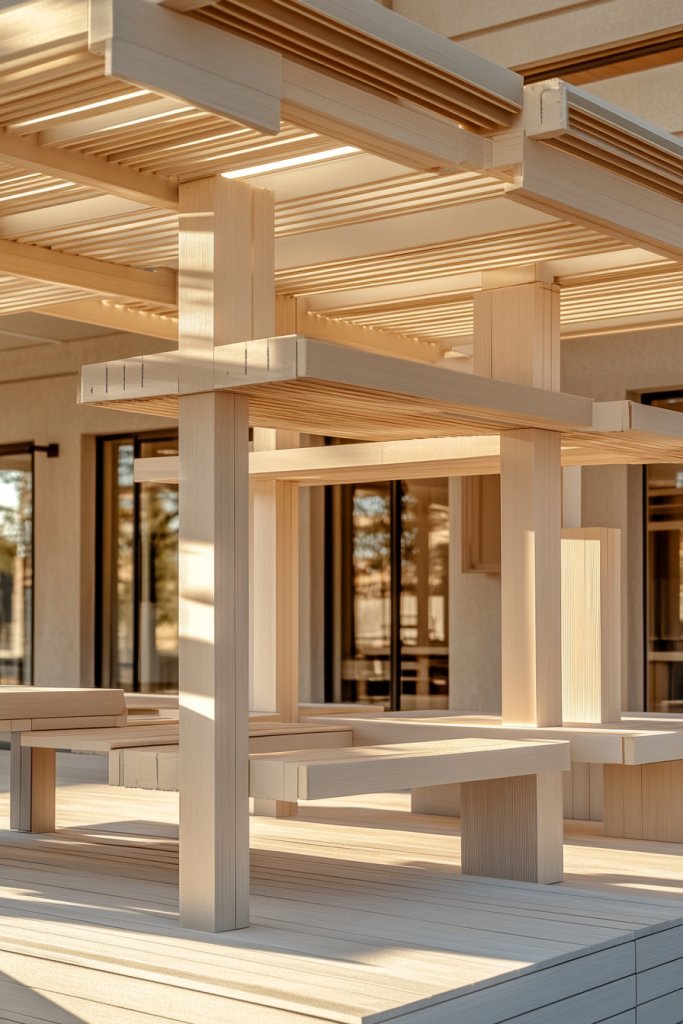
3. Modern Minimalist Pergola with Clean Lines
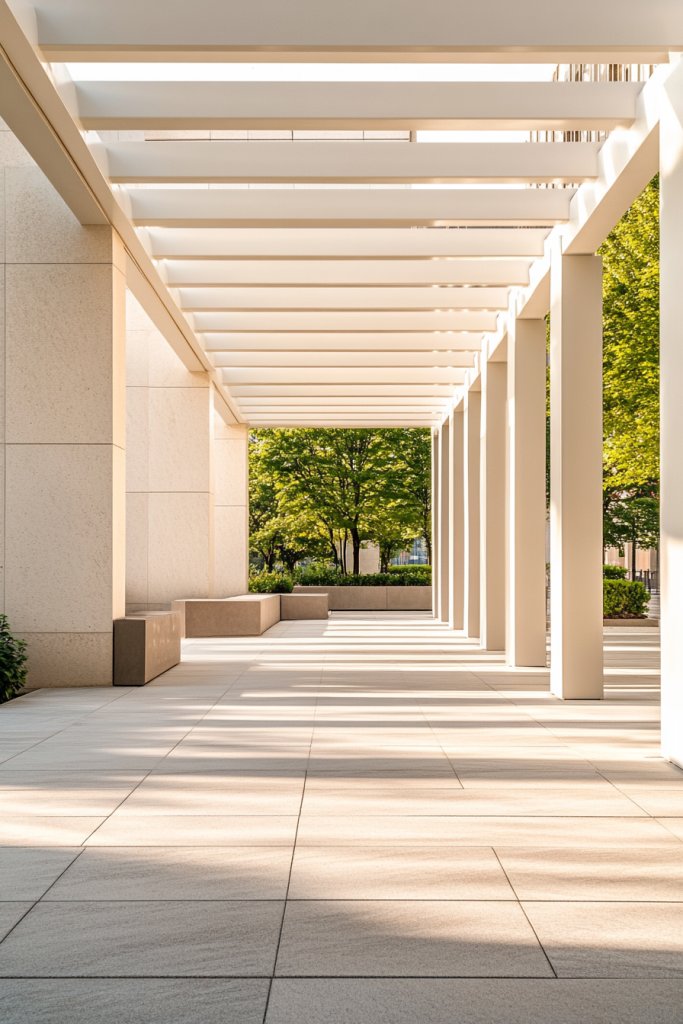
A modern minimalist pergola offers sleek sophistication with a focus on simplicity and functionality. Featuring clean geometric shapes, neutral colors, and minimal ornamentation, this design elevates your outdoor space with a contemporary vibe that’s both stylish and practical.
It’s perfect for lovers of modern architecture and clutter-free aesthetics. Picture a pergola composed of straight, smooth columns made of powder-coated metal or painted wood in shades of charcoal, matte black, or crisp white.
The beams are slim yet sturdy, creating a streamlined silhouette that emphasizes form over ornamentation. The open lattice roof allows dappled sunlight to filter through, casting geometric shadows on the ground.
Add a few modern outdoor furnishings—such as a concrete table or sleek metal chairs—and the space instantly feels polished and inviting. The overall atmosphere is calm and orderly, with a focus on clean lines and neutral tones that complement any outdoor decor.
Start by planning your layout with precise measurements, choosing durable materials like aluminum or painted wood for longevity. Use simple hardware—like L-brackets and bolts—to assemble the frame, and consider attaching a flat, slatted roof for a seamless look.
For easy DIY, pre-cut kits and ready-made posts can accelerate construction. Keep the color palette monochromatic or add subtle accents with outdoor cushions or planters in muted shades. This approach results in a chic, low-maintenance pergola perfect for modern outdoor living.
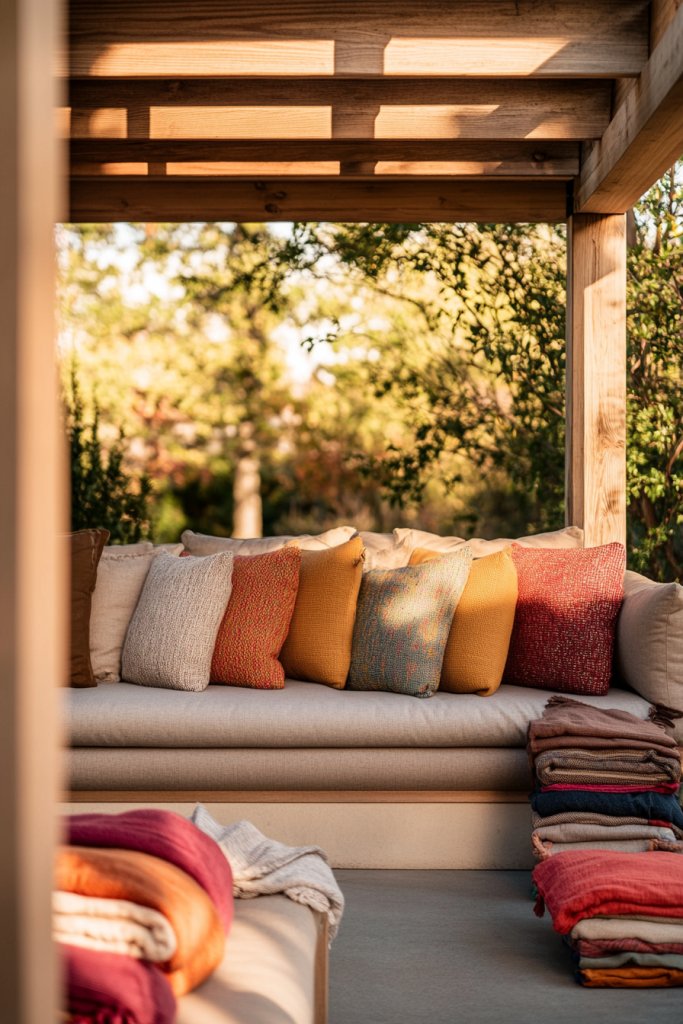
4. Pergola with Built-In Seating Nooks
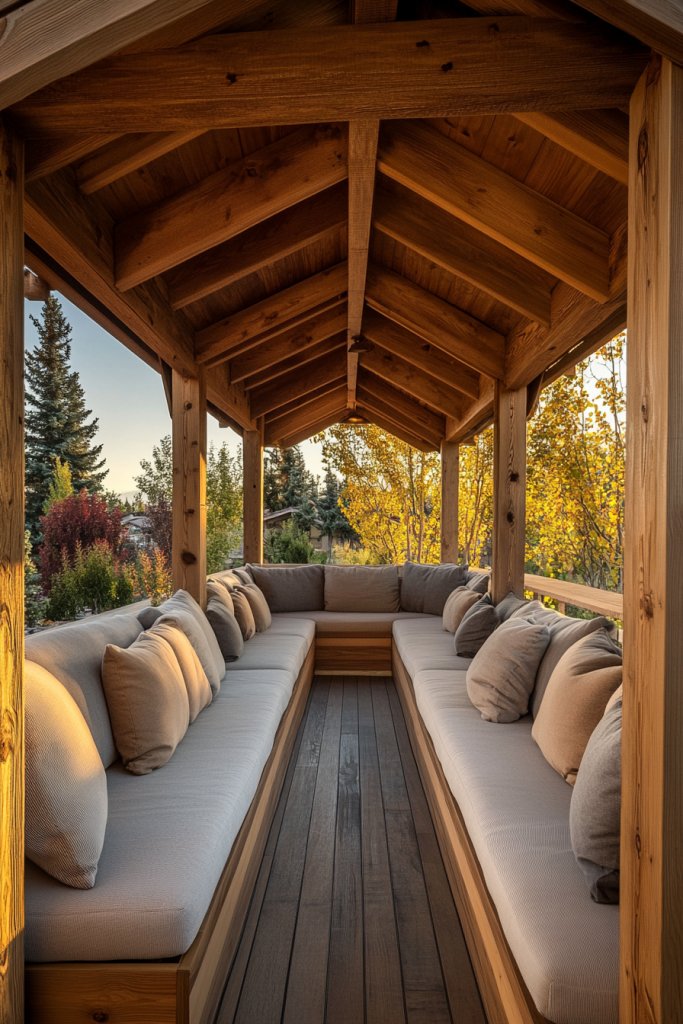
Incorporating built-in seating into your pergola design maximizes comfort and functionality, transforming your outdoor space into a cozy lounge area. This clever addition creates a seamless flow between structure and furniture, making it easy to relax, socialize, or enjoy a quiet moment surrounded by nature.
Visualize sturdy wooden benches or curved curvilinear seats integrated into the sides of the pergola frame. These can be crafted from the same material as the pergola or a contrasting finish for visual interest.
Cushions in weatherproof fabrics—like a soft beige or calming pastel—invite you to sit for hours. The seating area can be adorned with decorative pillows, lanterns, or small side tables nestled into the corners.
The entire setup feels intimate and inviting, with the pergola overhead providing partial shade and a sense of enclosure. It’s a perfect spot for reading, chatting, or enjoying outdoor meals in comfort.
To build it yourself, start by designing the bench dimensions based on your space, then attach pressure-treated wood or composite decking to the pergola posts using galvanized hardware. For beginner-friendly options, pre-made garden bench kits or repurposed pallets can work well.
Secure the seating firmly, add cushions, and finish with weatherproofing sealants if needed. This integrated design saves space and adds a personalized, cozy touch to your outdoor living area, making it an all-in-one retreat.
5. Fabric Drapes for Shade and Privacy
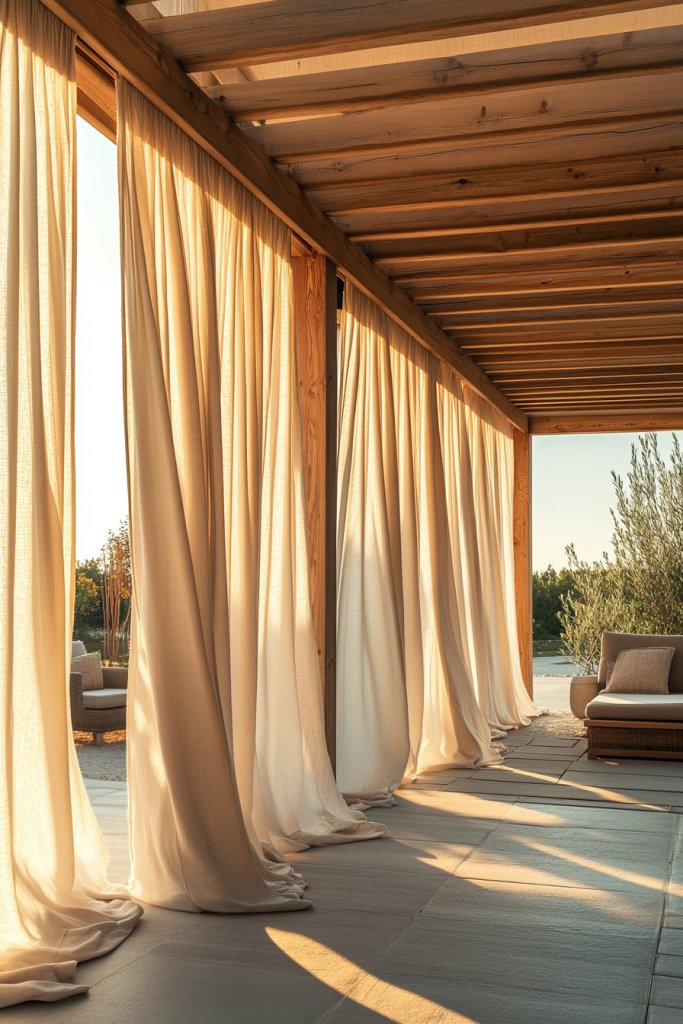
Adding flowing fabric drapes to your pergola instantly elevates its elegance while providing much-needed shade and privacy. This soft, versatile solution creates a gentle, breezy atmosphere that’s perfect for relaxing, entertaining, or creating intimate corners within your outdoor space.
Picture long, lightweight curtains made of linen or outdoor-rated polyester in shades like soft white, beige, or blush. They are suspended from the top beams with hooks, rings, or a tension wire, allowing them to sway gently in the breeze.
When closed, the fabric offers privacy from neighbors while softening the structure’s lines, adding a touch of romantic charm. The movement of the fabric creates a soothing visual and auditory experience, with the gentle fluttering sounds enhancing the ambiance.
These drapes can be tied back for an open feel or drawn closed for a cozy, secluded nook. To install, measure the length and height needed for your pergola, then purchase weather-resistant curtain panels with grommets or hooks.
Use garden hooks, tension wires, or curtain rods attached securely to the beams. For added privacy, layer multiple panels or select heavier fabrics. Simple to assemble, this project requires only basic tools and creates a stunning, customizable backdrop that transforms your pergola into a serene outdoor sanctuary—perfect for lazy afternoons or evening gatherings.
6. Pergola with a DIY Tiled or Patterned Roof
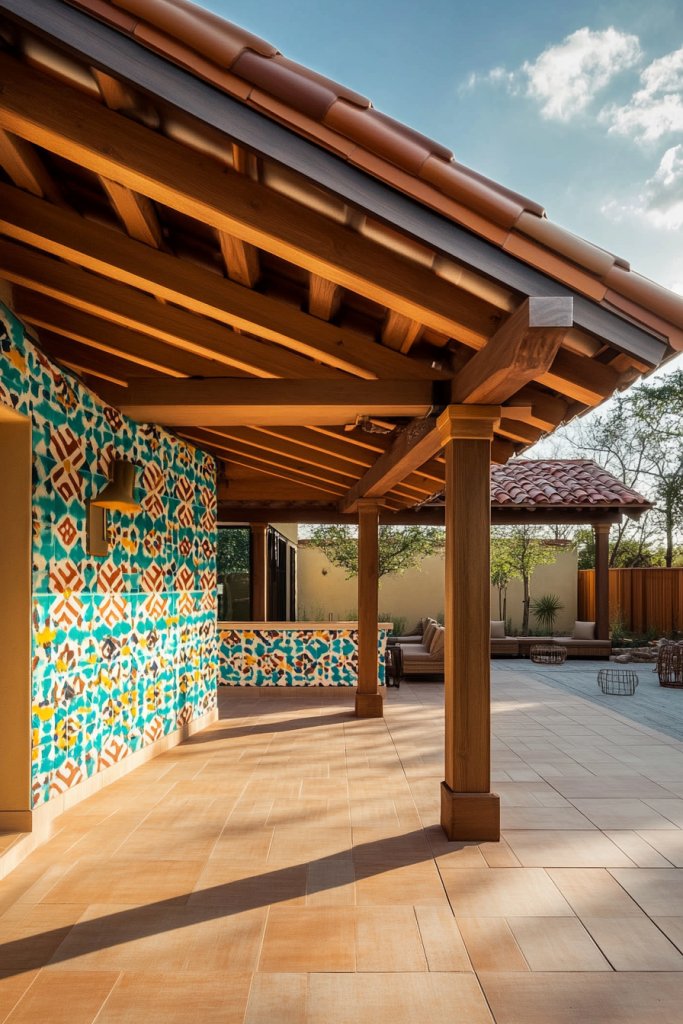
Transforming your pergola with a tiled or patterned roof instantly adds visual interest and a personalized touch to your outdoor space. This idea works beautifully to create a colorful, eye-catching canopy that invites curiosity and admiration.
It’s a perfect way to showcase your creativity while elevating the overall aesthetic of your backyard retreat. Imagine a pergola topped with a mosaic of vibrant ceramic tiles in shades of blues, greens, and terracotta, or perhaps a geometric pattern made from painted wood panels.
The textured surface catches the light differently throughout the day, casting playful shadows onto your seating area. The roof feels lively and artistic, with a tactile quality that invites touch, while the colorful patterns add a cozy, Mediterranean vibe or modern flair depending on your choices.
This visually dynamic canopy not only provides shade but also sparks conversations and compliments. Getting started is straightforward: first, build or modify your pergola frame, ensuring it’s sturdy enough to support a tiled or patterned surface.
For a tiled roof, use weatherproof ceramic or glass tiles, attaching them with outdoor-grade adhesive on a plywood base or directly onto a waterproof layer. Alternatively, paint or stain wooden panels with bold geometric patterns, sealing the surface for weather resistance. With a few basic tools, some patience, and creative spirit, you can craft a stunning, one-of-a-kind tiled or patterned roof that turns your pergola into an outdoor statement piece.
7. Vertical Garden Walls for a Lush Backdrop

Creating a vertical garden wall on your pergola transforms an ordinary outdoor structure into a lush, vibrant oasis. This idea combines greenery with a decorative element, giving your space a fresh, natural feel and providing privacy without obstructing light.
It’s perfect for those who want a garden-inspired ambiance even in compact outdoor areas. Picture a series of lattice panels or trellises attached to the pergola’s side, filled with decorative containers or small hanging pots.
Instead of traditional plants, consider using faux greenery or succulents for low-maintenance options, or select hardy, shade-tolerant plants like ferns and ivy if you prefer live arrangements. The wall can be textured with cascading vines, or filled with colorful flowers in ceramic or rustic wooden containers.
The overall effect is a lively, textured green backdrop that softens the structure’s lines, adds visual depth, and invites a sense of tranquility and renewal. To build this feature, start by installing sturdy lattice panels or trellises on your pergola frame.
Then, select your containers—consider decorative ceramic pots, vintage buckets, or reclaimed wood boxes—and fill them with your chosen plants. Secure the containers to the lattice with cable ties or hooks.
If you prefer a maintenance-free option, opt for artificial greenery arranged in a similar manner. This project is adaptable for beginner DIYers and can be customized with different plant types and container styles to suit your aesthetic and climate.
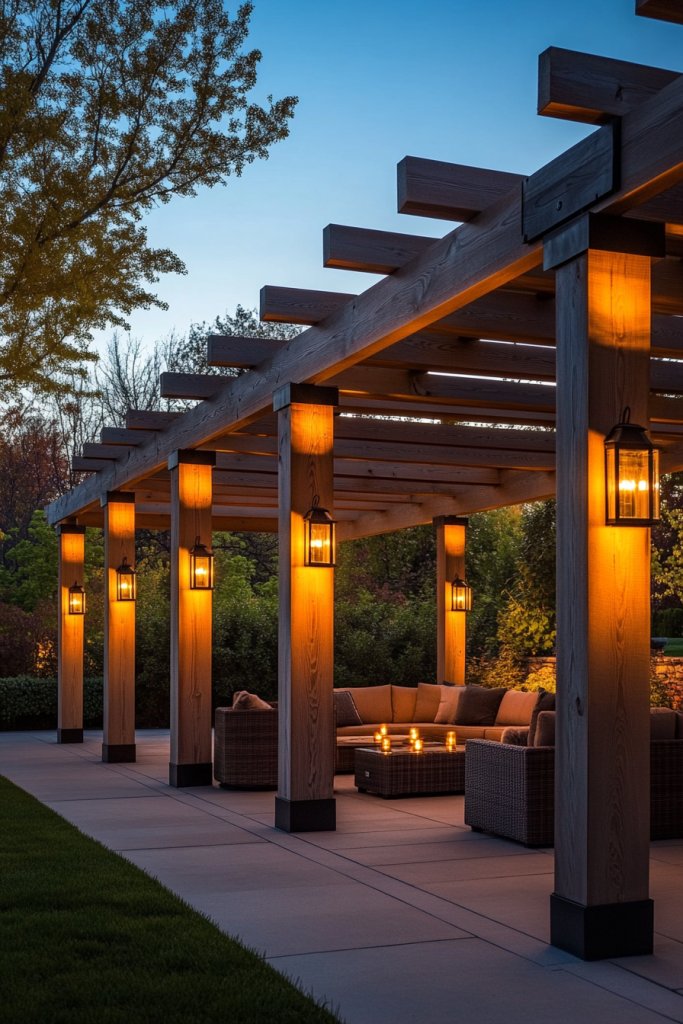
8. Stringed Fairy Lights and Lanterns for Nighttime Charm
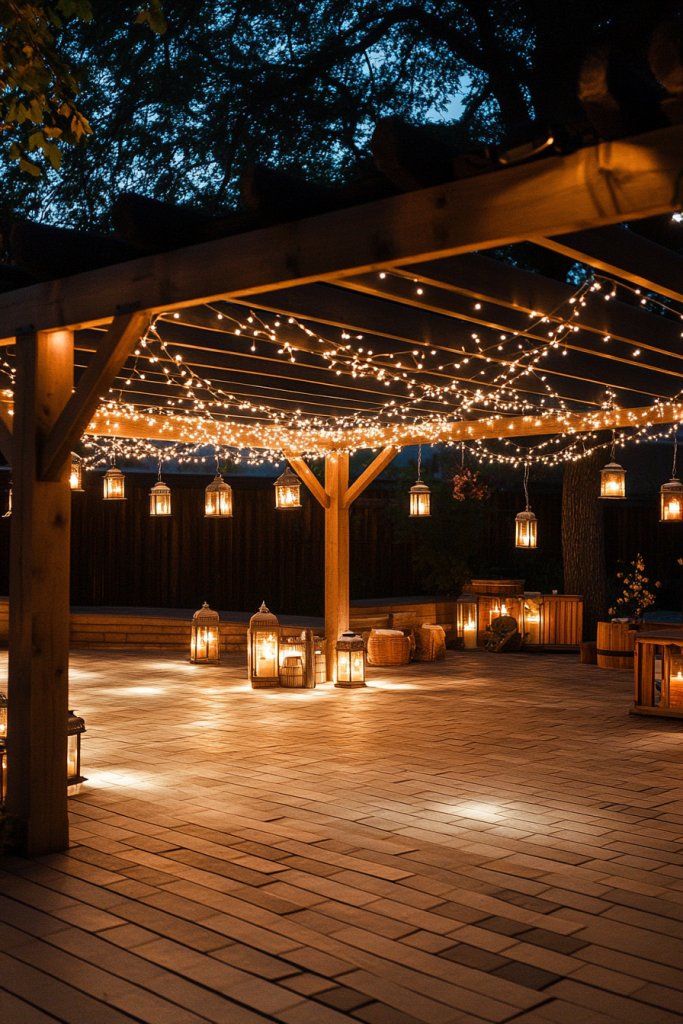
Adding stringed fairy lights and lanterns to your pergola instantly creates a magical, inviting atmosphere after sunset. This idea transforms your outdoor retreat into a cozy, enchanting space perfect for evening gatherings, romantic dinners, or quiet nights outdoors.
Visualize delicate, warm-white fairy lights draped along the beams and posts, casting a soft, ambient glow that flickers gently. Intertwined with rustic lanterns or hanging paper lanterns in soft pastel or bold colors, the lighting design adds layers of visual interest and a whimsical touch.
The warm light reflects off nearby surfaces and textures, creating a cozy, welcoming environment. The gentle hum of the evening air, combined with the soft glow, makes your pergola feel like a private little haven, perfect for unwinding or entertaining guests.
To recreate this look, start by choosing weatherproof string lights with warm or cool white bulbs, and secure them along the beams and posts using hooks, zip ties, or clips. For lanterns, hang a few at varying heights for depth and movement; battery-operated options with timers make setup easier.
You can also incorporate solar-powered lights for an eco-friendly touch. Layering multiple light sources and adjusting their placement allows you to achieve your desired ambiance, making your outdoor space a nighttime sanctuary filled with soft, enchanting light.
9. DIY Pergola with a Pergola-Style Pergola Topper
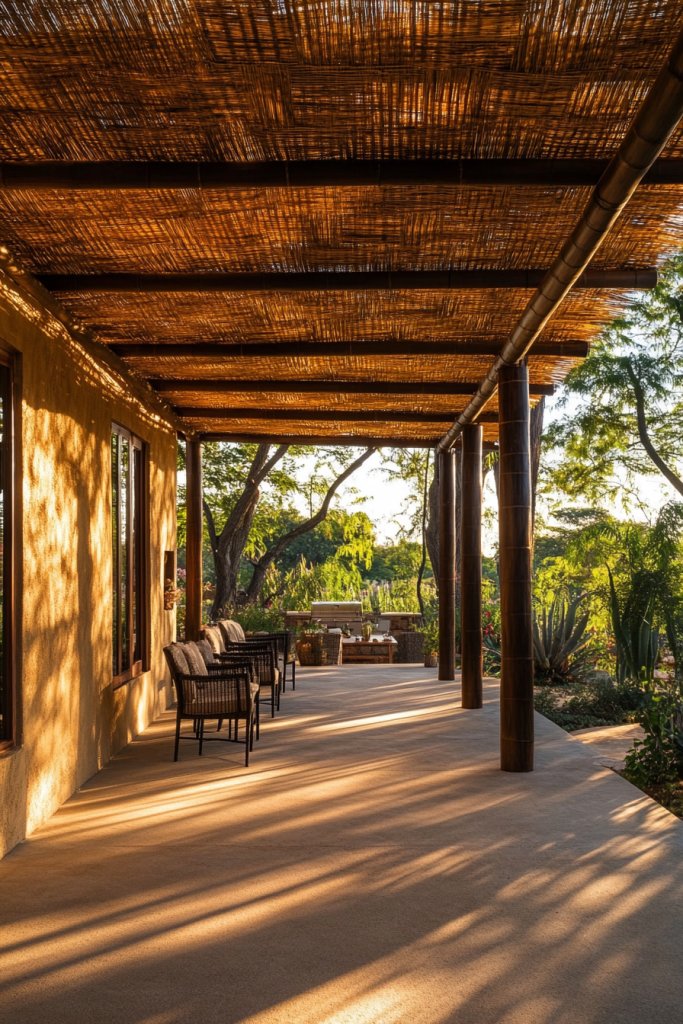
Creating a layered shading effect with a pergola topper adds both visual intrigue and functional comfort to your outdoor space. This concept involves adding an extra “roof” layer made from natural materials like bamboo, reed mats, or fabric to increase shade and privacy while enhancing the pergola’s aesthetic appeal.
Imagine a pergola with a primary wooden frame, topped with a secondary layer of tightly woven bamboo or reed mats. The natural fibers create a textured, organic look that blends seamlessly with outdoor surroundings.
Alternatively, a fabric canopy made from weather-resistant canvas or polyester can be stretched across the top, providing adjustable shade and a breezy, relaxed feel. This layered approach creates a sense of enclosure and intimacy, while still allowing airflow and sunlight filtering through the gaps.
The overall effect is a cozy, resort-like retreat that invites relaxation and enjoyment. To build this topper, measure your pergola’s dimensions and cut your chosen material accordingly.
For natural reed or bamboo mats, attach them securely to the top beams with sturdy wire or zip ties, ensuring they’re taut to withstand wind. For fabric canopies, install a tensioning system with hooks or eye bolts to hold the fabric in place, and consider adding side ties or curtains for extra privacy. This project is accessible for DIY beginners with basic tools and offers endless customization options based on your preferred materials, style, and shading needs.
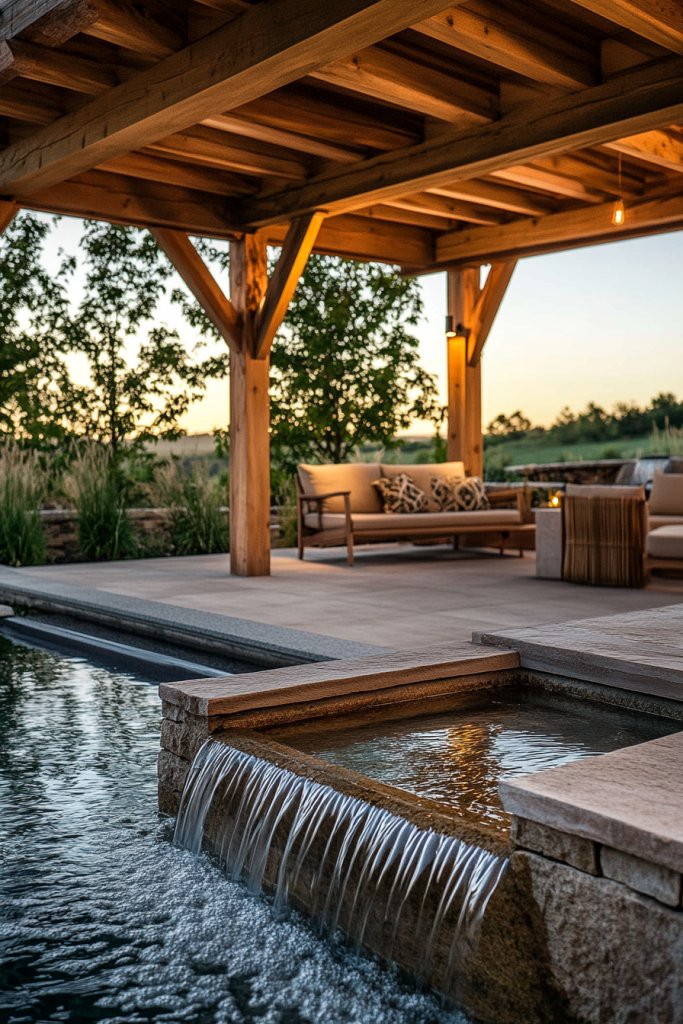
10. Incorporating a Fire Pit or Heater Area
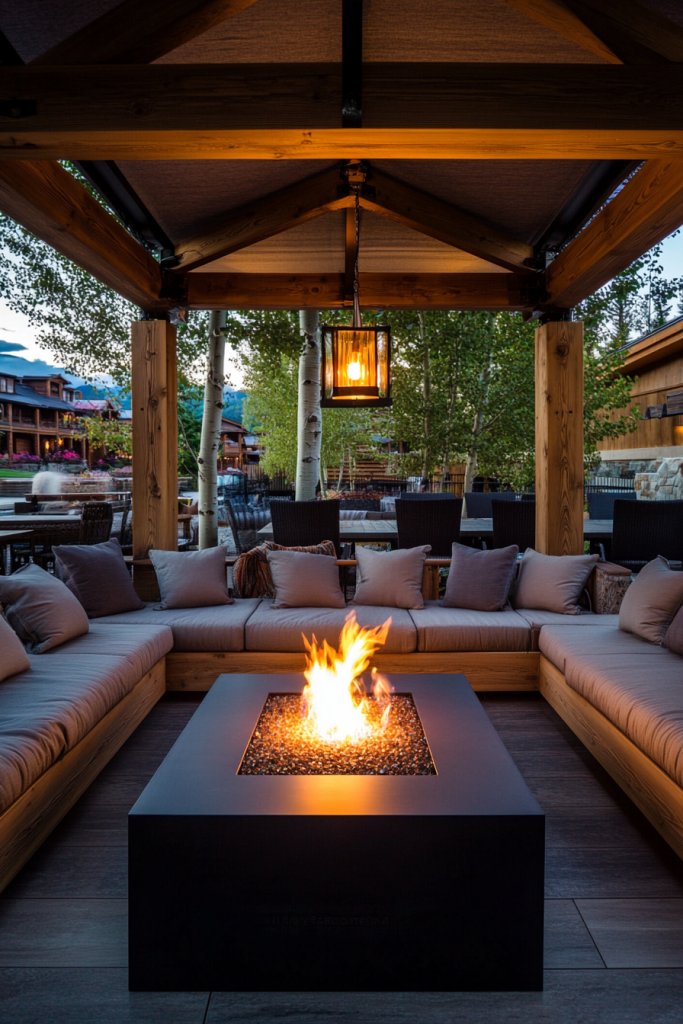
Adding a fire pit or outdoor heater area to your pergola creates a warm, inviting focal point that extends your outdoor season into cooler evenings. This feature encourages gatherings and cozy conversations, making your outdoor retreat more functional and enjoyable year-round.
Visualize a small, DIY-built fire pit made from fire-resistant bricks or stones nestled in a corner of your pergola space, surrounded by comfortable seating like outdoor cushions and blankets. Alternatively, a sleek, portable outdoor propane or electric heater can be positioned nearby, radiating warmth across your seating area.
The combination of flickering flames or gentle heat, soft lighting, and plush textiles creates an intimate, cozy ambiance. The scent of wood smoke or warm air, combined with the outdoor sounds, enhances the sensory experience, making your pergola a true haven in all seasons.
To implement this, choose a safe location away from flammable materials and structures. For a fire pit, assemble a simple ring using fireproof bricks or purchase a ready-made one, then line with gravel or fireproof mats.
For heaters, select a weatherproof outdoor model suitable for your space and follow the manufacturer’s safety instructions. Add comfortable cushions, weather-resistant throws, and ambient lighting to complete the scene. With a bit of planning and safety precautions, you’ll have a cozy, functional area perfect for relaxing evenings or entertaining guests under the stars.
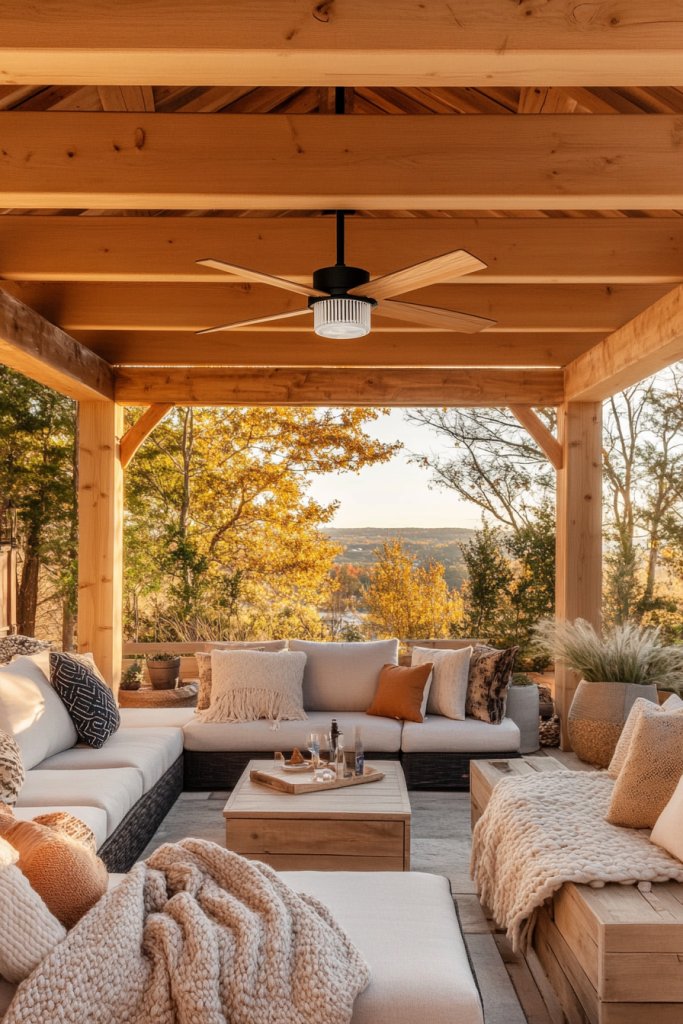
11. Stylish Outdoor Rug and Cushions for Comfort
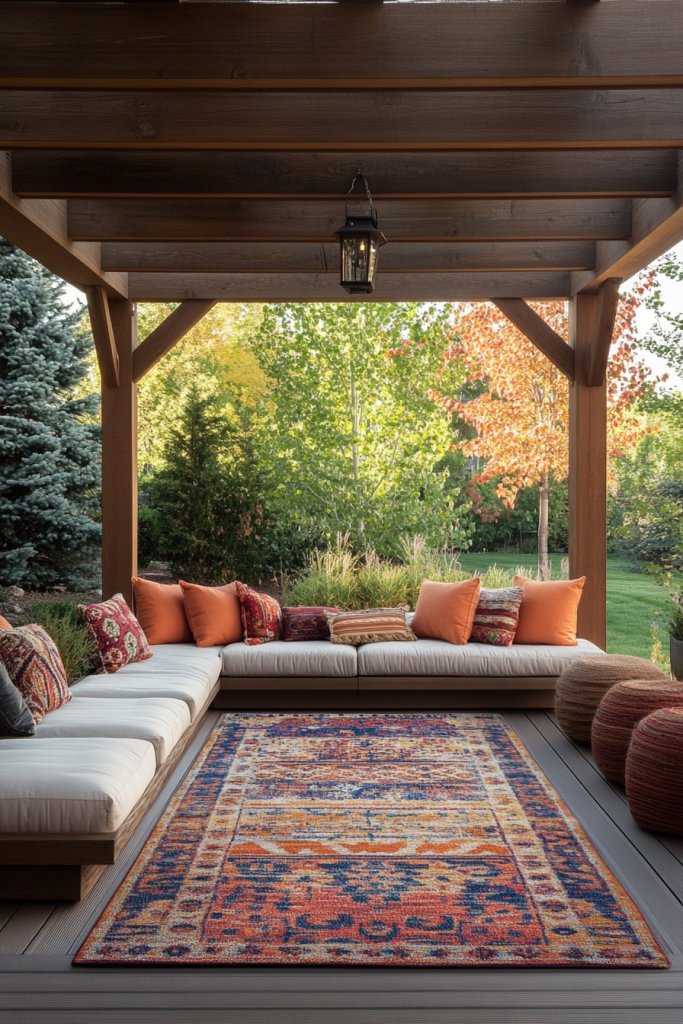
Transforming your pergola into a cozy haven starts with adding the right textiles—think vibrant outdoor rugs and plush cushions that invite relaxation. A colorful, patterned rug with weather-resistant fibers anchors the space, providing a soft surface underfoot that contrasts beautifully with the wooden beams.
Pair it with cushions in earthy tones or bright pops of color, made from durable, fade-resistant fabric like acrylic or polyester. These cushions, whether on built-in benches or scatter-style on chairs, create an inviting and comfortable environment, perfect for lounging or outdoor dining.
The textures—smooth, woven, or tufted—add tactile interest, while the scent of fresh fabric or outdoor-safe soaps can enhance the sensory experience. Overall, this layered approach transforms your pergola into an oasis of comfort and style.
To implement this look, start by selecting an outdoor rug measuring roughly 5×7 feet, depending on your space, in a pattern or color scheme that complements your overall outdoor decor. Next, choose cushions that fit your seating—preferably with removable, washable covers for easy cleaning.
Opt for weatherproof options like polyester or acrylic-filled cushions to withstand the elements. Arrange the cushions on your benches or chairs, adding smaller accent pillows for extra coziness.
To finish, add a few decorative throws, such as a soft cream throw blanket with chunky knit texture, for chilly evenings. All materials can be sourced from home improvement stores, online retailers, or specialty outdoor shops, with budget-friendly or premium options depending on your preferences.
Putting it all together is simple: lay your outdoor rug centered underneath your seating, then arrange the cushions in a way that encourages lounging. Secure or weight down the cushions if needed to prevent slipping.
Consider adding a few seasonal accessories like a woven basket or lanterns nearby to complete the cozy vibe. Remember, the key is layering textures and colors for a welcoming look that feels effortless yet thoughtfully curated. With just a few affordable textiles and some basic arrangement, your pergola becomes an inviting outdoor retreat you’ll love spending time in year-round.
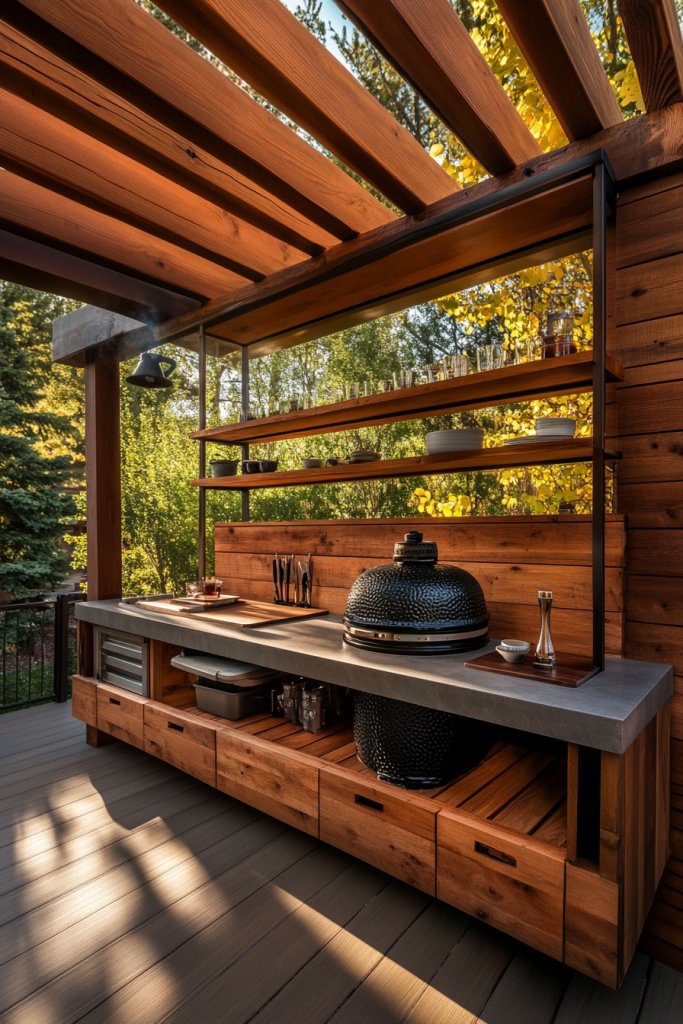
12. DIY Pergola with a Built-In Bar or Serving Station
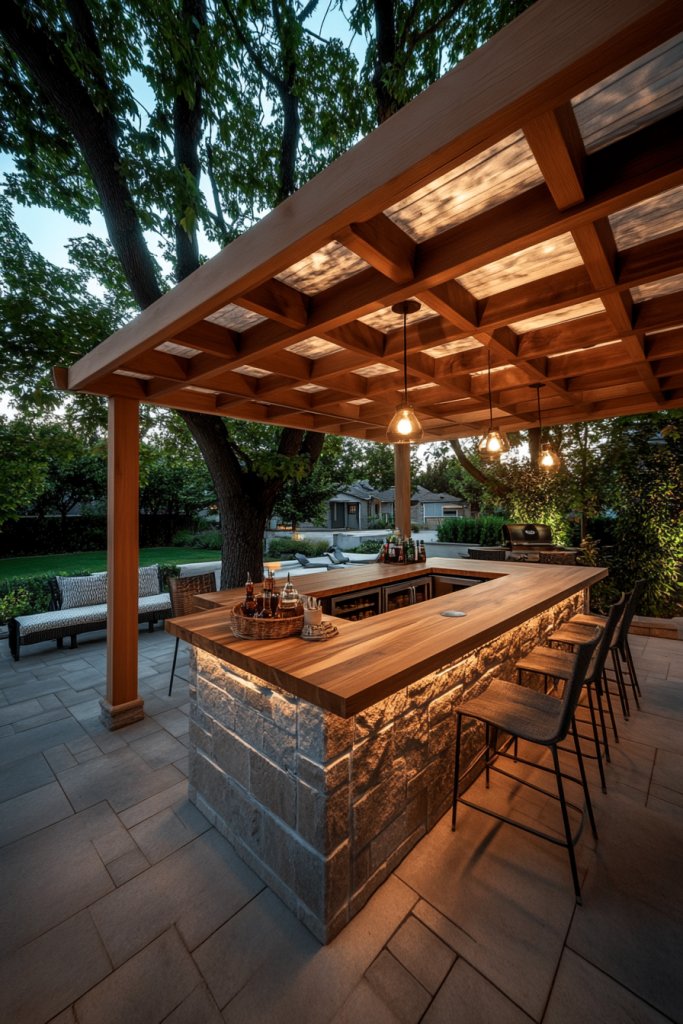
Creating a built-in bar or serving station within your pergola turns it into the ultimate outdoor entertaining hub. Imagine a sturdy, weatherproof countertop, crafted from pressure-treated wood, cedar, or composite decking material, running along one side of the structure.
Below it, install open shelves or cabinets to store glasses, bottles, and utensils, using water-resistant plywood or outdoor-grade MDF for durability. To amp up style, add a backsplash with slate tiles or stainless steel panels, which are easy to clean and visually striking.
Incorporate a small sink and a portable mini-fridge if space allows, making cocktail prep and snack storage effortless. The entire setup can be customized with string lights overhead and decorative lanterns or planters nearby for an inviting ambiance.
Building this station involves a few straightforward steps: first, measure your available space and sketch your design, ensuring enough room for comfortable movement. Cut your main counter supports from pressure-treated lumber or composite boards, then attach a durable tabletop like trex decking or sealed plywood.
Securely fasten shelves or cabinets underneath for storage, and add a backsplash for protection and visual appeal. Finish with weatherproof paint or stain to prolong life, and install electrical outlets or lighting fixtures as needed.
For a budget-friendly option, repurpose reclaimed wood or pallets to craft the countertop and storage units, giving your space an eco-chic vibe. Once assembled, stock your bar with your favorite outdoor drinkware, add some colorful cocktail stirrers, string lights, and a few potted herbs nearby to enhance the sensory experience.
Position your serving station at a convenient corner of your pergola—preferably near a seating area—and make sure it’s level and stable. This DIY project is accessible for most skill levels with basic tools, and it instantly elevates your outdoor space into a stylish, functional retreat perfect for summer barbecues, birthday parties, or casual weekend gatherings. With a little planning, you’ll have a custom outdoor bar that’s both beautiful and practical.
13. Pergola with Hanging Decorative Sculptures or Art Pieces
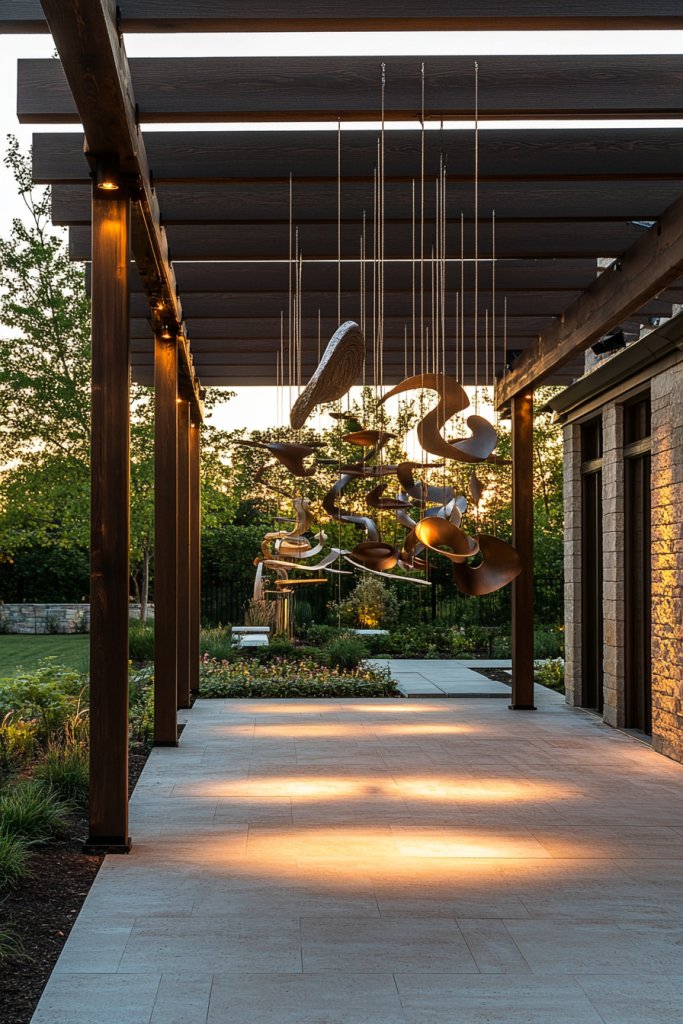
Adding hanging sculptures or decorative art pieces to your pergola introduces a unique, personalized touch that elevates your outdoor space. Visualize lightweight, weatherproof sculptures—such as metal mobiles, wind chimes, or hanging glass orbs—suspended from the beams using sturdy hooks or carabiners.
These elements sway gently in the breeze, catching the sunlight and creating mesmerizing movement and sound. Choose pieces in materials like patinated copper, painted metal, or durable resin, with colors that complement your overall design—soft neutrals, bold metallics, or vibrant hues.
Layering different shapes and sizes creates visual interest, transforming your pergola into a captivating outdoor gallery that reflects your personality. To achieve this look, start by selecting art pieces that match your style—perhaps abstract metal sculptures, bohemian mobiles, or hanging terrariums with fairy lights inside.
Attach strong, rust-resistant hooks to the beams, spacing the sculptures at varying heights for a dynamic effect. Secure each piece thoroughly, considering safety and stability, especially in windy areas.
For added charm, incorporate string lights or LED fairy lights intertwined with the sculptures to enhance nighttime visual appeal. You can also add small decorative objects like lanterns or wind chimes to complement the hanging art and create a layered sensory experience.
Putting this together is simple: plan your layout by visualizing how the sculptures will sway and catch light, then install hooks or mounting hardware accordingly. Hang your chosen sculptures, adjusting heights to achieve a balanced, artistic display.
Keep safety in mind—use weatherproof materials and secure fastenings. With a small investment in decorative hanging pieces and a few tools, you’ll create a whimsical, artistic focal point that makes your pergola truly one-of-a-kind. This DIY enhancement is a delightful way to infuse your outdoor retreat with personality and charm, perfect for relaxing evenings or lively gatherings.
14. Adding a DIY Pergola with a Retractable Canopy
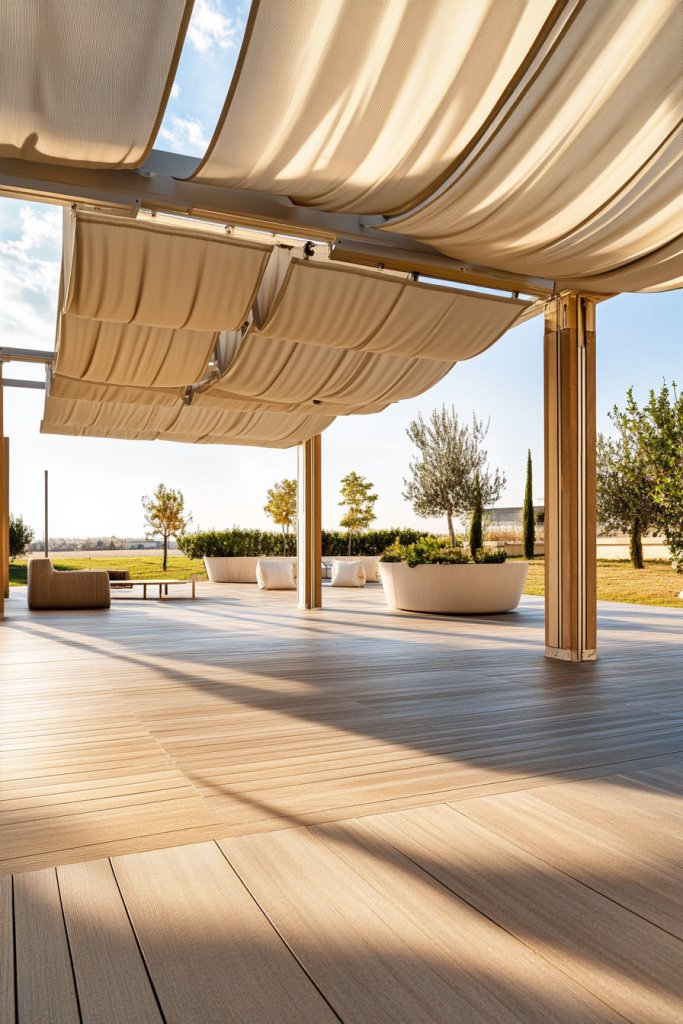
A retractable canopy transforms your pergola into a versatile outdoor retreat, offering shade on hot days and shelter during unexpected showers. Imagine a sturdy frame with a roll-up fabric cover—think UV-protected, water-resistant polyester or acrylic—that can be easily extended or retracted using a simple pulley or sliding mechanism.
When open, the canopy provides a crisp, clean look in neutral tones like beige, slate gray, or crisp white, complementing any outdoor decor. When retracted, it reveals the open beams and allows full sunlight to brighten your space.
This adaptable feature makes your pergola functional across seasons, adding both aesthetic appeal and practical comfort. To build this, start with a durable frame using pressure-treated wood or metal posts anchored securely into the ground.
Install a roller mechanism or a set of pulleys at the top of the beams, then attach your weatherproof fabric with strong, rust-resistant hardware. For ease of use, choose a manual or motorized retractable system available at outdoor or hardware stores.
Measure your space carefully, ensuring the fabric width matches your desired coverage, and add tie-downs or side curtains for added privacy and wind resistance. For a budget-friendly approach, repurpose an old outdoor umbrella mechanism or use a ready-made retractable awning kit, adapting it to your pergola’s dimensions.
Once installed, simply pull or roll the canopy to your preferred position—whether fully extended for maximum shade or retracted for sunlight and breeze. Keep the fabric clean with gentle washing and inspect hardware periodically for wear.
This DIY upgrade offers an elegant, practical solution for outdoor comfort, allowing you to enjoy your pergola year-round, regardless of weather. With minimal tools and some careful planning, you’ll have a stylish, functional canopy that enhances your outdoor living experience.
15. Upcycled Pallet Wood Pergola Panels
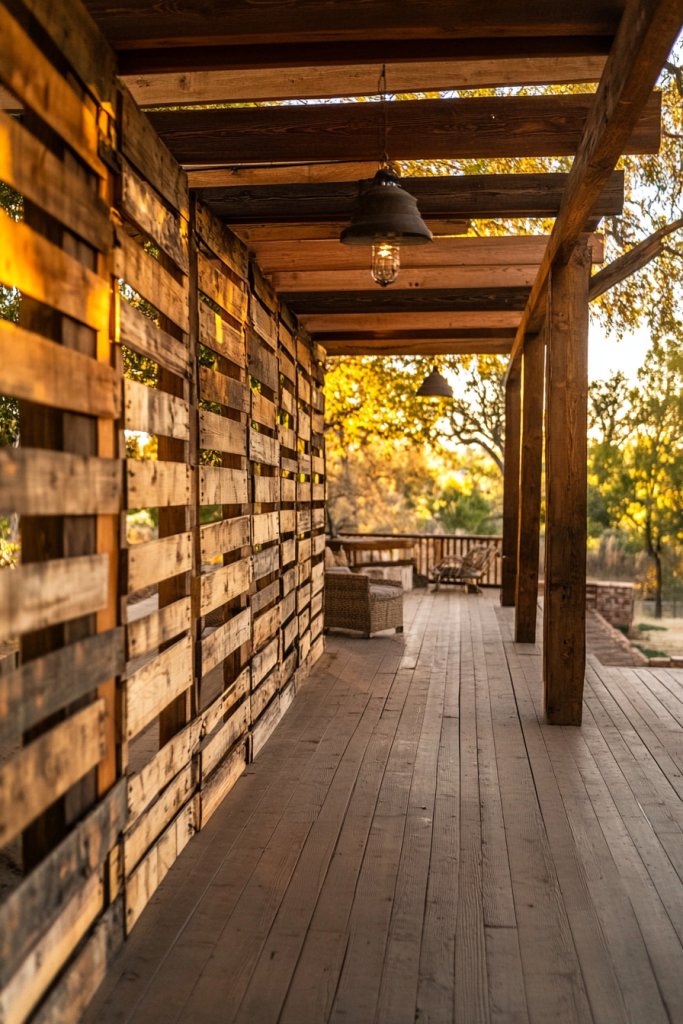
Using upcycled pallet wood to create decorative panels for your pergola is an eco-friendly way to add texture, privacy, and visual interest. Picture rustic, handcrafted screens made from reclaimed wooden pallets, featuring a charming, weathered appearance with natural knots and imperfections.
These panels can be used as privacy screens, decorative accents, or even partial roofing elements, allowing dappled sunlight to filter through in a relaxed, boho-chic vibe. The natural tones of the pallet wood—ranging from light honey to deep brown—blend effortlessly with greenery and other natural materials, creating a warm, inviting atmosphere.
To make these panels, start by disassembling pallets carefully, removing nails and splinters. Cut the wood into your desired panel sizes—commonly 3-4 feet wide and 6-8 feet tall—using a saw.
Arrange the slats in a pattern you like, whether evenly spaced for a slatted look or layered for more privacy, then fasten them together with galvanized nails or screws. Optionally, stain or seal the wood with a weatherproof finish to prolong its lifespan and enhance its rustic appeal.
Attach the finished panels to your pergola’s posts or beams using sturdy brackets or hinges, ensuring they are securely anchored and allow for airflow and light. This project is highly accessible for beginners, especially when using reclaimed materials and simple tools like a saw, drill, and screwdriver.
The main challenge lies in sourcing quality pallet wood—look for pallets marked with “HT” (heat-treated) rather than chemically treated options—and ensuring all nails are removed or replaced. The result is a charming, upcycled element that adds character and privacy to your outdoor space while remaining budget-friendly. With minimal investment, a little DIY effort, and a love for sustainability, you’ll craft beautiful, functional panels that elevate your pergola into a truly unique outdoor retreat.
16. Pergola with Integrated String Curtain Walls for Privacy
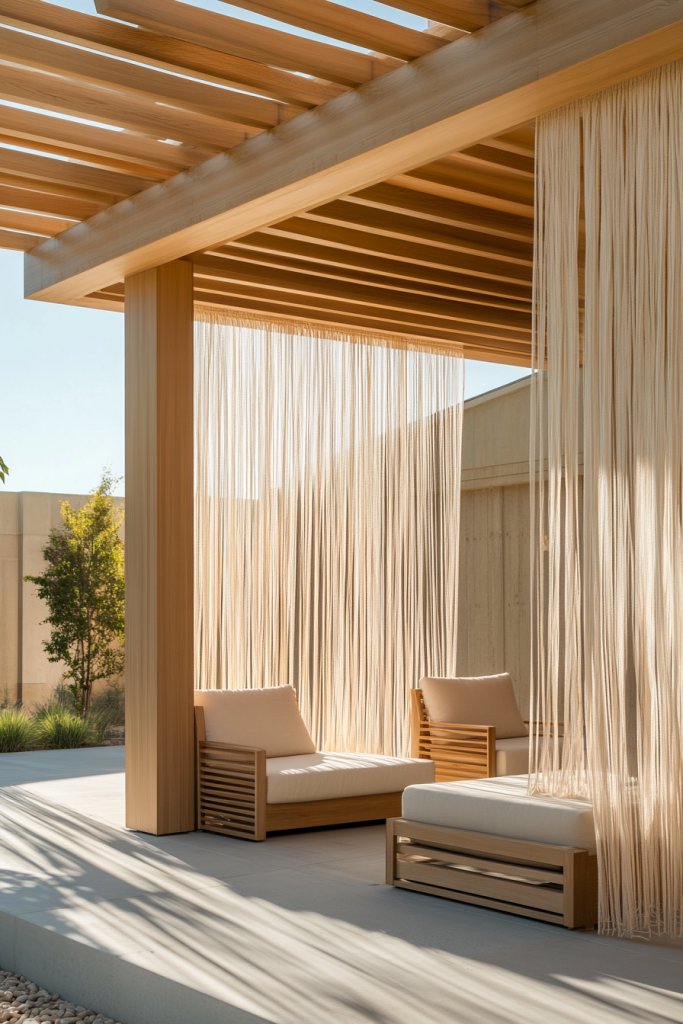
Transform your outdoor space into a private oasis with the addition of string curtain walls integrated into your pergola design. These lightweight, flowing curtains create a soft barrier that shields against wind and prying eyes while maintaining an airy, open feel.
Their gentle sway in the breeze adds a touch of movement and elegance, making your retreat feel both cozy and stylish. Imagine thin, semi-transparent strings of white or neutral-toned fabric hanging from the beams of your pergola, gently brushing the sides as you relax underneath.
The curtains can be gathered to one side or left to cascade freely, creating a layered texture that enhances the visual depth of the space. When illuminated with subtle fairy lights, they cast a warm, inviting glow and create a sense of intimacy without feeling enclosed.
The overall effect is a blend of modern minimalism and bohemian charm, perfect for lounging or outdoor dining. To recreate this look, start with lightweight, durable string curtains made from polyester or nylon, which are resistant to weather.
Attach them securely to the top beams of your pergola using hooks or curtain rods, ensuring they can be easily opened or closed. For added privacy, you can incorporate tiebacks or magnetic closures. This simple DIY project requires minimal tools—just a drill, hooks, and the curtains—and results in a beautifully functional privacy feature that’s easy to maintain and adjust.
17. DIY Pergola with Embedded Solar-Powered Lanterns
Create a magical, eco-friendly ambiance in your outdoor retreat by embedding solar-powered lanterns directly into your pergola structure. These lanterns soak up sunlight during the day and glow softly at night, offering a warm, flickering light that elevates any evening gathering.
This idea combines sustainability with style, making your space feel both cozy and innovative. Visualize small, decorative lanterns nestled into the beams or hung from the posts of your pergola, casting a gentle amber or white glow across the area.
Some lanterns come with decorative metal or glass exteriors, adding a rustic or modern touch that complements your overall design. The embedded lights create a starry effect overhead, and since they’re solar-powered, you won’t need any electrical wiring—just a sunny spot for charging.
The overall look is charming, atmospheric, and effortlessly sustainable, perfect for outdoor dinners or relaxing evenings under the stars. To implement this, choose weatherproof solar lanterns with stakes or hooks designed for outdoor use.
Attach them securely along the top beams or nestle them into holes drilled into the wood, ensuring they’re positioned to maximize sunlight exposure during the day. Connect the solar panels to the lanterns following the manufacturer’s instructions. Minimal tools are needed—mainly a drill and screws—and you’ll enjoy hassle-free lighting that transforms your pergola into a cozy nighttime retreat without any ongoing electricity costs.
18. Cozy Nook with DIY Blanket and Pillow Stations
Design a dedicated cozy nook within your pergola where comfort is king, complete with DIY blanket and pillow stations that invite relaxation all year round. This space becomes your personal sanctuary, perfect for reading, napping, or enjoying quiet moments outdoors.
Thoughtfully layered textiles and inviting accessories turn your pergola into a plush retreat that feels like a home away from home. Picture a corner with a weatherproof, cushioned bench or floor seating draped with a soft, chunky-knit throw blanket in warm tones like cream or rust.
Add a variety of plush cushions—think textured velvet, woven, or faux fur—in complementary colors such as deep navy, blush pink, or earthy browns. These tactile elements invite touch and create a visually inviting space.
The surrounding ambiance can be enhanced with fairy lights or lanterns, while scented candles or outdoor incense fill the air with calming aromas. This cozy setup turns your pergola into an all-season hideaway, perfect for unwinding on chilly evenings or lazy weekends.
To create this nook, start with a sturdy outdoor bench or use outdoor cushions and mats for a comfortable seating base. Add a selection of weather-resistant blankets—fleece, faux fur, or chunky knits—and a mix of cushions in various sizes.
Keep a small basket or storage ottoman nearby to hold extra blankets and pillows for easy access. Simple, affordable, and customizable, this DIY project transforms your outdoor space into a snug haven that beckons you to relax and linger.
19. Pergola with a DIY Water Feature or Fountain Nearby
Enhance your outdoor retreat with the soothing sounds and tranquil visuals of a DIY water feature or fountain situated close to your pergola. The gentle trickle of water adds a calming atmosphere, making your space feel like a private spa retreat.
Combining water with your pergola’s structure creates a harmonious environment that invites relaxation and mindfulness. Imagine a small, handcrafted fountain made from repurposed materials like a vintage basin, a ceramic pot, or stacked stones, with water bubbling up from the center.
The sound of flowing water echoes softly through the space, blending with natural outdoor sounds and creating an immersive sensory experience. The water feature can be positioned in a corner or directly underneath the pergola, with decorative elements like pebbles, plants, or lanterns surrounding it.
The overall aesthetic is peaceful and organic, perfect for unwinding after a busy day or entertaining friends in a serene setting. To build this, gather materials such as a waterproof basin, a small submersible pump, and decorative stones or tiles.
Follow simple DIY tutorials for creating a fountain—most require minimal plumbing skills. Place the basin on a level surface, connect the pump, and conceal the wiring.
Add your decorative elements and surround with gravel or plants for a natural look. With just a few tools and some creativity, you can craft a tranquil water feature that transforms your pergola into a calming outdoor sanctuary.
20. Pergola with Decorative Rope or Twine Accents
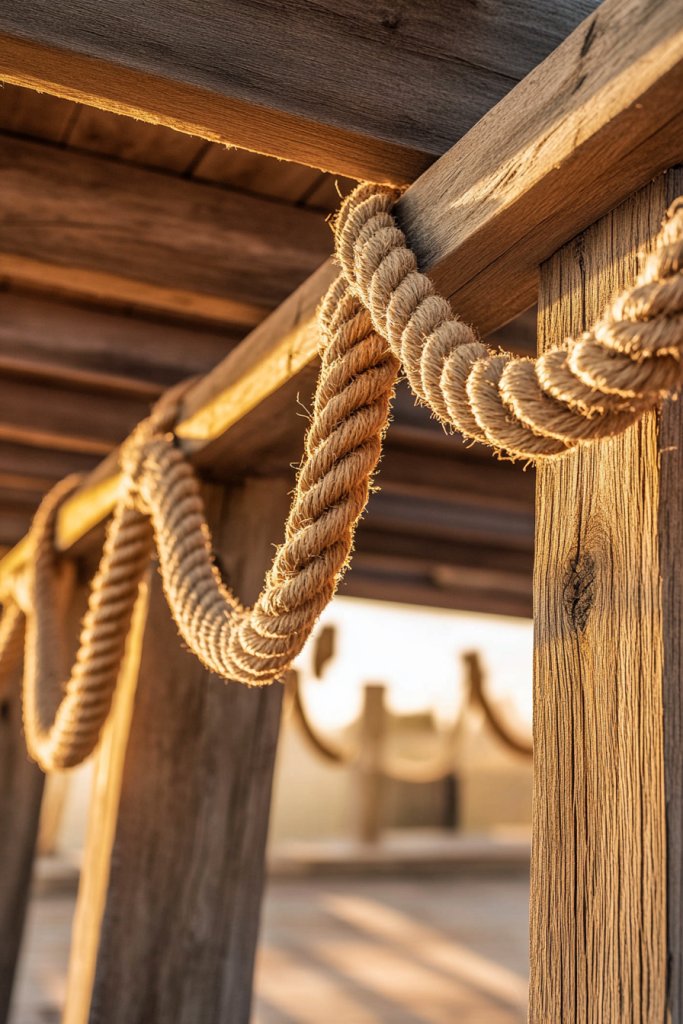
Add visual interest and a touch of rustic charm to your pergola by wrapping decorative rope or twine around its beams, posts, and crossbars. This simple yet stylish detail enhances the overall aesthetic with texture and subtle patterning, creating an inviting, artisanal vibe that complements many outdoor decor styles.
Picture thick jute or sisal rope spiraled around the vertical posts, with smaller twine loops intertwined across the beams. You can incorporate knots, tassels, or beads to personalize the look further, adding a handcrafted feel.
The textured ropes contrast beautifully against wooden beams, especially when finished with a weathered or stained finish. During the day, the natural fibers add warmth and rustic charm; at night, string lights woven into the rope can create a soft, ambient glow.
This decorative element elevates the visual appeal while also subtly defining different zones within your outdoor retreat. To implement, select durable, weather-resistant ropes like jute, sisal, or nylon, depending on your preferred look and climate.
Wrap the ropes tightly around the beams and secure with strong knots or hooks. Add decorative accents such as wooden beads, tassels, or small lanterns—either DIY or purchased—to enhance the aesthetic. This project requires basic knotting skills and minimal tools, making it an accessible way to add handcrafted charm and texture to your pergola while creating a cozy, inviting atmosphere.
21. Incorporating a DIY Outdoor Barbecue or Cooking Station
Transforming your pergola into an outdoor culinary haven can elevate your backyard gatherings and make al fresco dining effortless. A dedicated barbecue or cooking station offers both functionality and a focal point that invites socialization.
Think of a compact, weatherproof countertop paired with simple storage for grilling tools, all seamlessly integrated into your pergola design. Visualize a sturdy wooden or metal countertop—perhaps made from weather-resistant cedar or stainless steel—adorned with a portable grill or built-in cooktop.
Surround it with a few hanging hooks for utensils and a small shelf for spices or condiments. The space feels lively and inviting, with aromatic hints of grilled food wafting through the air, complemented by the rustic or modern aesthetic of your setup.
Getting started is straightforward: gather essential materials such as a fireproof countertop surface (like treated wood or stainless steel), a portable grill or built-in unit, and weatherproof storage containers. Position your station in a corner of your pergola, ensuring easy access to propane or electricity if needed. Use simple tools like a drill, screwdriver, and level to assemble your setup, and add personal touches like hanging lanterns or a small potted herb garden nearby for extra flavor and ambiance.
22. Pergola with a DIY Privacy Screen Using Macramé or Textile Art
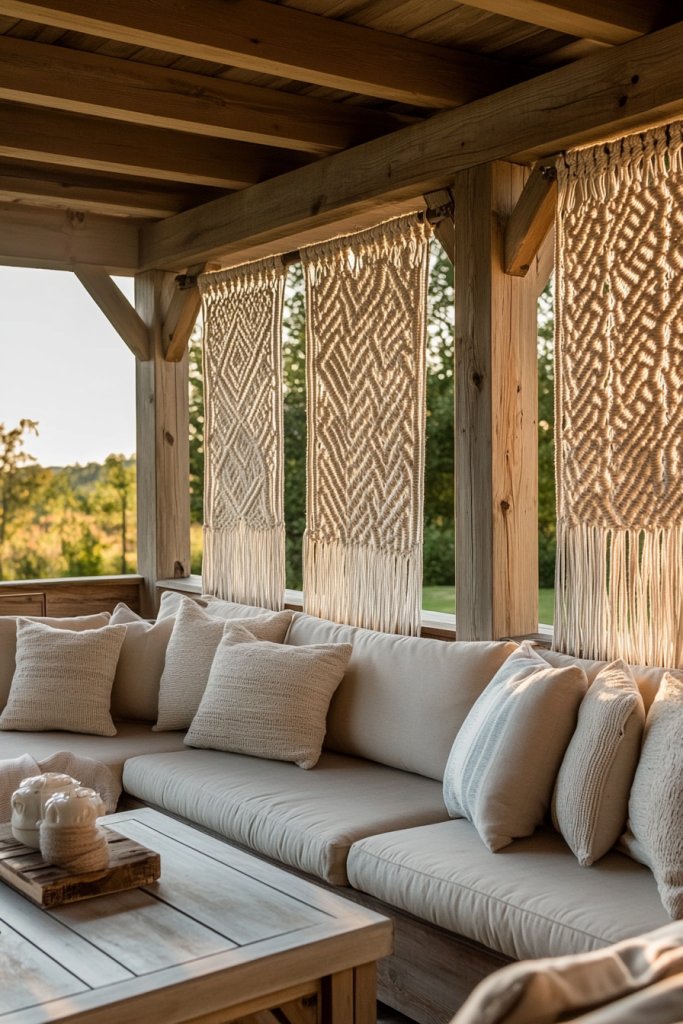
Creating a cozy, private oasis under your pergola can be achieved beautifully with handcrafted macramé or textile panels that serve as both decor and screening. These soft, textured elements add a boho-chic vibe while blocking wind and prying eyes, making your outdoor space feel like a secluded retreat.
Imagine thick, intricate macramé panels with knotted patterns cascading from the beams, or woven textile curtains in neutral tones like beige, blush, or deep terracotta. They sway gently in the breeze, adding movement and softness to the structure.
The tactile quality of the textiles invites touch, and their layered look offers depth and visual interest, transforming an open pergola into a personal hideaway. To implement this idea, start with macramé cord or heavy-duty outdoor fabric—preferably water-resistant or UV-treated for longevity.
Attach the panels to your pergola beams using s hooks or clamps, arranging them at varying heights for a dynamic effect. For a beginner-friendly approach, opt for pre-made textile curtains or adjustable tension rods. This DIY project is budget-friendly, customizable, and perfect for adding privacy without sacrificing style.
23. Installing a DIY Outdoor Ceiling Fan for Comfort
A ceiling fan under your pergola can turn your outdoor space into a breezy oasis, especially on hot days or muggy evenings. It improves air circulation, making lounging more comfortable and extending your outdoor enjoyment well into the warmer months.
Plus, many outdoor fans come with stylish designs that complement various aesthetic styles. Visualize a sleek, weatherproof ceiling fan mounted centrally on your pergola’s overhead beams.
The blades might be crafted from durable wood or composite materials, with a modern or rustic finish that matches your decor. When spinning gently, it creates a refreshing breeze that rustles through fabric drapes or textiles, enhancing the sensory experience of your outdoor retreat.
At night, integrated lighting options can add a cozy glow, making the space inviting after sunset. To install a DIY outdoor ceiling fan, first select a model rated for outdoor use—look for UL-listed fans with weather-resistant components.
Secure the fan to a sturdy overhead beam using the included mounting hardware, ensuring proper electrical wiring if needed (consult a professional if unfamiliar). Use a long outdoor extension cord or hardwired connection, and consider adding a remote control for convenience. With a few basic tools—drill, screwdriver, and ladder—you can enjoy cool comfort in your backyard sanctuary.
24. Pergola with Decorative Iron or Metal Accents
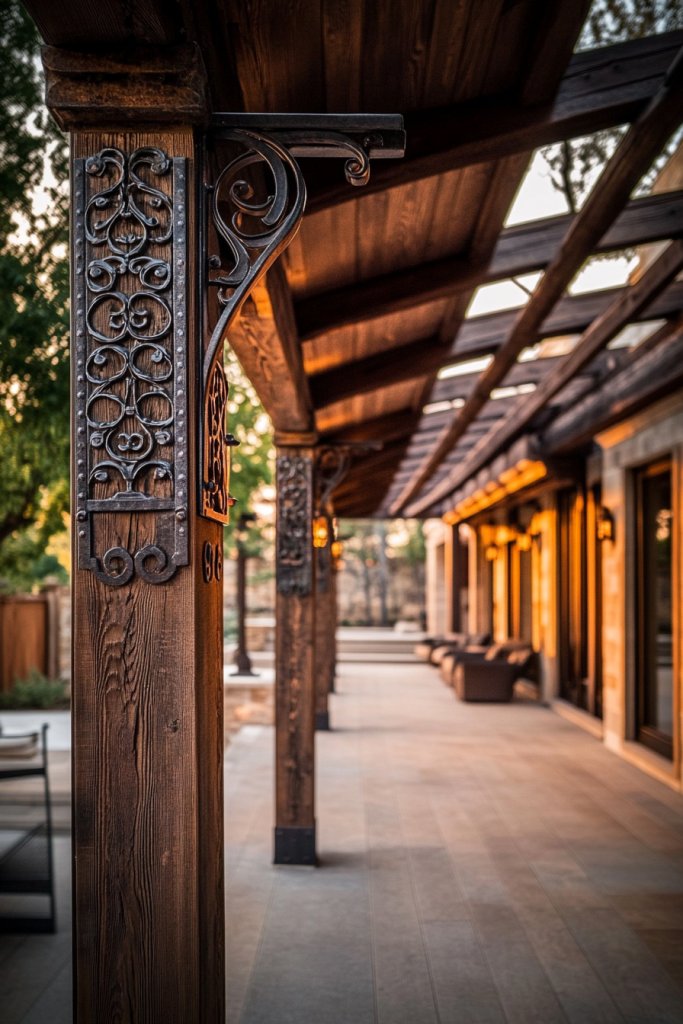
Adding decorative iron or metal accents elevates your pergola’s aesthetic, infusing it with elegance and timeless charm. Ornamental scrolls, brackets, or panels can be strategically placed along beams and posts, creating a striking visual contrast with natural materials and adding a sophisticated touch.
Picture ornate metal scrollwork wrapped around the posts, or decorative brackets supporting a pergola topper. These details, in finishes like matte black, antique bronze, or brushed nickel, catch the light and draw the eye, giving your outdoor space a custom, curated look.
Complemented by ambient lighting or string lights, these accents help transform a simple structure into a statement piece that blends rustic charm with industrial elegance. To incorporate these elements, choose metal decorative panels or scrollwork made from rust-resistant materials like powder-coated steel or aluminum.
Attach them securely to your pergola’s posts and beams with appropriate fasteners—screws or bolts—using a drill and level for precise placement. For a DIY approach, sourcing ready-made decorative pieces from local hardware stores or online retailers makes installation straightforward. These accents add a touch of sophistication that makes your outdoor retreat truly one-of-a-kind.
25. Customizable Modular Pergola Components for Future Expansion
Designing your pergola with modular components offers flexibility, allowing you to adapt and expand your outdoor retreat as your needs evolve. This approach ensures your space remains functional and stylish over time, saving you money and effort on future renovations.
Imagine a pergola built with interlocking sections, such as removable side panels, adjustable roof slats, or easily attachable accessories like additional lighting or planters. Using standardized connectors or quick-assembly hardware, you can reconfigure or enlarge your structure without starting from scratch.
This adaptability encourages creativity, allowing you to add features like a sunshade, privacy screens, or decorative elements as desired. Start with a basic frame made from durable materials like pressure-treated lumber or aluminum, incorporating bolt-and-nut systems or interlocking joints for easy assembly.
Choose components that are compatible with future additions—such as modular panels or extendable beams. Keep the design simple and scalable, and document your plan with measurements and sketches. This future-proof setup means your outdoor retreat can grow with your lifestyle, offering endless customization possibilities with minimal effort.
Conclusion
With so many creative DIY pergola ideas—from cozy seating nooks and elegant lighting to eco-friendly materials and functional outdoor kitchens—there’s endless potential to transform your outdoor space into a personalized retreat. Whether you prefer a sleek modern design or rustic charm, these projects invite you to craft a cozy, stylish haven right at home.
Don’t hesitate to experiment and tailor these ideas to suit your vision—your perfect outdoor sanctuary awaits. Take the first step today and turn your outdoor space into a beautiful, inviting retreat you’ll cherish for years to come.
Leave a Reply