Ever feel like your small space is more cluttered than cozy? If so, you’re not alone! DIY room decor ideas have surged in popularity because they offer affordable, personalized solutions to transform tiny rooms into functional and stylish retreats. Plus, creating your own decor adds a special touch that truly reflects your personality, making your space uniquely yours.
In this article, you’ll discover a wealth of creative and practical DIY decor ideas tailored to tackle small space challenges head-on. From clever storage hacks to space-enhancing design tricks, each idea is designed to inspire you to maximize every inch of your home without breaking the bank. Get ready to turn your tight quarters into a beautifully organized and inviting sanctuary with these innovative, easy-to-follow projects!
1. Multi-Functional Furniture Hacks for Maximum Utility
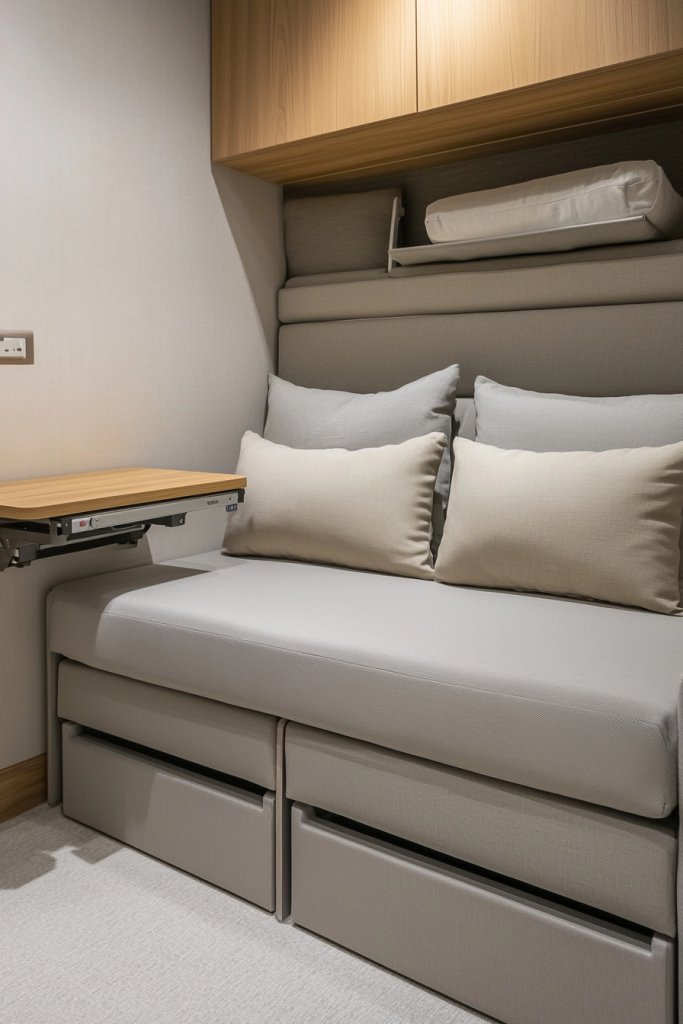
Imagine transforming your small space with furniture that does double duty, making every inch work harder for you. Multi-functional furniture not only saves space but also adds versatile style and practicality to your home, turning clutter into clever organization.
Picture a sleek storage ottoman in a soft, neutral beige fabric, topped with a plush, textured throw pillow in warm terracotta tones. Nearby, a fold-out desk with a smooth wooden surface and built-in compartments seamlessly combines a workspace with extra storage, while a compact sofa bed features hidden drawers underneath for linens and gadgets.
The overall look is cozy yet uncluttered, with clean lines, tactile textiles, and subtle metallic accents that catch the light. The space feels inviting and well-organized, with a calming mix of matte finishes and soft fabrics that invite relaxation and efficiency.
Getting started is easier than you think. Begin by choosing furniture pieces that serve more than one purpose, like an ottoman with storage or a wall-mounted fold-down table—many are available at furniture stores or DIY-able with simple woodworking.
Use sturdy wood, fabric, or even repurposed crates for DIY options, and add cushions or soft throws for comfort. Install a wall bracket for a fold-down desk and ensure you have basic tools like a drill, screwdriver, and measuring tape. With a little planning, you’ll maximize your space and create a functional, stylish room that adapts to your needs.
2. Vertical Wall Storage Solutions to Free Up Floor Space
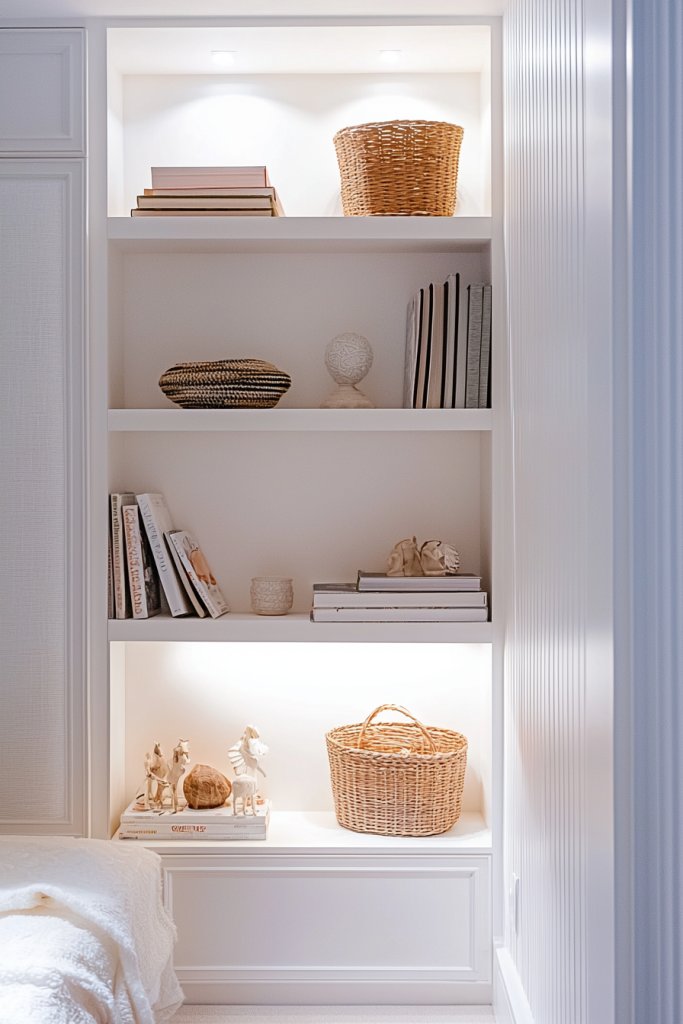
Transforming blank walls into functional storage solutions is a game-changer for small spaces. Vertical wall storage not only maximizes limited square footage but also adds a stylish focal point to your room, making it feel more organized and inviting.
Imagine a sleek set of floating shelves painted in a soft matte white, contrasting beautifully with a light gray wall. These shelves are adorned with trendy ceramic vases, woven baskets, and decorative boxes in warm earth tones, creating a cozy yet modern vibe.
The textured surfaces of these materials—smooth ceramics, rough woven fibers, and matte painted wood—invite touch and add depth to the space. The arrangement leaves ample room for small decorative objects or personal keepsakes, making the wall both functional and visually appealing.
Soft ambient light casts gentle shadows across the shelves, enhancing the layered look and adding a sense of warmth and tranquility to the room. Getting started is easier than you might think! Begin by choosing sturdy floating shelves or wall-mounted racks made from wood, metal, or even repurposed materials like reclaimed pallets.
Secure them into wall studs for stability, using basic tools like a drill and level. Decorate with your favorite non-plant accessories such as ceramic vases, decorative boxes, or colorful baskets—alternatives to plants that still add personality.
If you prefer a cohesive look, opt for a color palette that complements your room’s overall scheme, like neutral tones with pops of warm color. With a few simple steps, you’ll have a stylish, space-saving wall that keeps clutter at bay while adding charm and character to your small room.
3. DIY Space-Saving Floating Shelves for Display and Storage
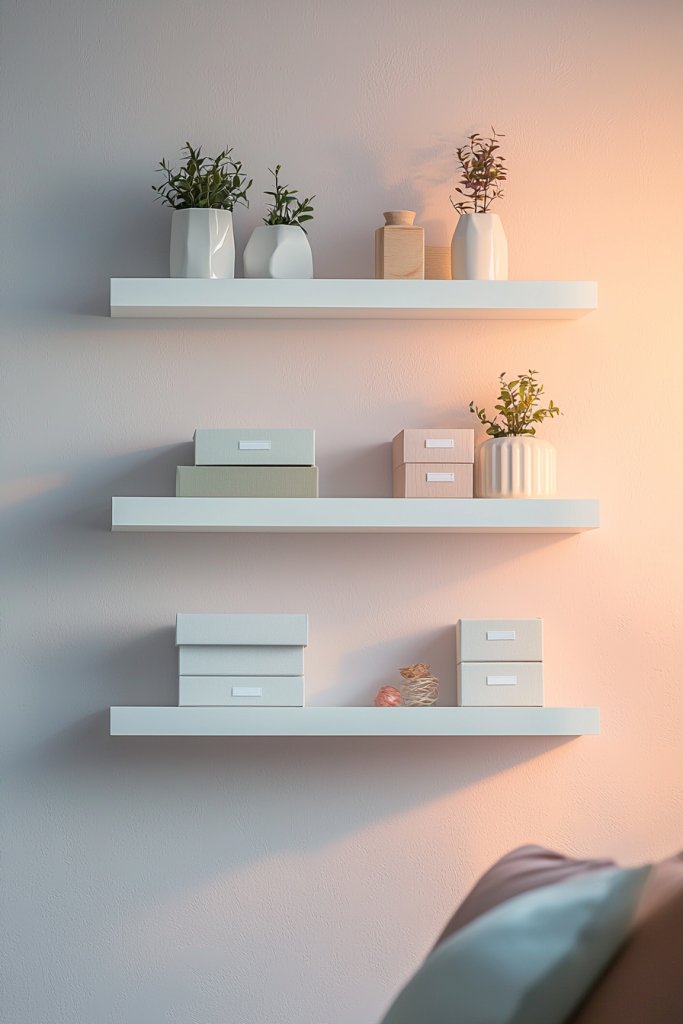
Maximize your small space with DIY floating shelves that seamlessly blend style and function, creating extra storage without cluttering your room. These clever shelves turn empty wall space into a showcase for your favorite decor, making your room feel larger and more organized.
Imagine sleek, minimalist floating shelves made from light-colored wood or painted in soft pastel shades like blush pink or powder blue. They hover effortlessly against a crisp white or muted gray wall, offering a clean, modern look.
You can display a collection of decorative ceramics, vintage books with colorful spines, or cozy candles with textured exteriors. The shelves add visual interest with their subtle presence, while the space beneath remains open and airy, enhancing the room’s sense of spaciousness.
The textures—from smooth wood to rough ceramic—bring warmth and tactile appeal, making your wall a captivating focal point that invites both admiration and touch. Getting started is simple and budget-friendly.
You’ll need basic materials like wooden planks or pre-made floating shelf brackets, a drill, and wall anchors, which are often included. Cut or choose shelves of the desired length—ideally around 24 to 36 inches—then install the brackets securely into wall studs or with anchors for added stability.
For a more personalized touch, paint or stain the shelves beforehand, or add decorative adhesive strips underneath for a floating illusion. With just a few tools and some DIY spirit, you can create a stylish storage solution tailored perfectly to your space.
4. Creative Use of Hidden Storage Under Stairs or Benches
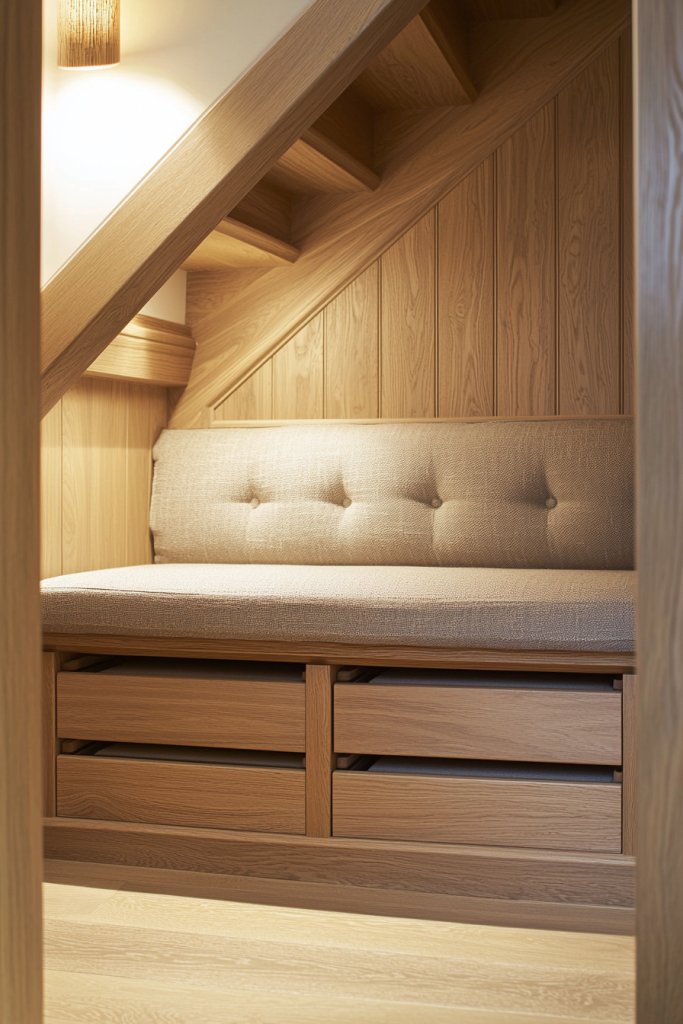
Maximize your small space by cleverly transforming hidden areas under stairs or benches into functional storage solutions that don’t clutter your home. This smart approach not only keeps your space tidy but also adds an element of surprise and ingenuity to your decor.
Imagine a cozy nook beneath a staircase painted in soft pastel hues, with sleek, smooth wooden drawers that slide out effortlessly. The area is lined with plush, textured cushions in warm tones like caramel or deep charcoal, inviting you to sit comfortably while keeping clutter out of sight.
Subtle LED strip lighting highlights the hidden compartments, giving the space a warm glow at night. The overall look is clean and organized, with hidden compartments seamlessly integrated into the design, making the space feel larger and more inviting.
To create your own hidden storage under stairs or benches, start by measuring the available space carefully. You’ll need sturdy plywood or MDF boards to build drawers or compartments—these can be painted or finished with veneer for a polished look.
If you prefer a softer touch, add cushions made from foam and upholstered in your favorite fabric, like linen or faux leather. Install simple sliding mechanisms or drawer runners for smooth operation, and consider adding decorative touches such as brass handles or colorful knobs for a personalized flair. With just a few basic tools and materials, you can turn an overlooked corner into a clever storage haven that’s both stylish and practical.
5. Repurposed Ladder as a Stylish and Practical Room Organizer
A repurposed ladder isn’t just a vintage find—it’s a versatile and stylish way to organize your space without sacrificing charm. Perfect for small rooms, this DIY hack transforms an everyday object into a practical statement piece that keeps clutter at bay while adding character.
Imagine a sleek wooden ladder painted in a soft matte white leaning against a wall, with colorful woven scarves draped over the rungs, complementing neutral-toned walls and cozy textiles. You might see a few decorative baskets hanging from the steps, filled with magazines or throw blankets, giving the entire setup a warm, inviting feel.
The textures range from smooth painted wood to the soft, tactile fabrics, creating a layered look that’s both functional and visually appealing. The space feels lively yet organized, with a sense of effortless creativity that sparks joy every time you enter the room.
Getting this look is simple and budget-friendly. Start with an old wooden ladder—preferably in good condition—and give it a fresh coat of paint if desired.
Use sturdy hooks or clips to hang baskets, scarves, or even small decorative objects like ceramics or sculptures from the rungs. You can also attach additional hooks for keys or jewelry.
Lean the ladder against the wall at a slight angle for stability, and arrange your chosen accessories to suit your style and needs. With just a few basic supplies, you’ll have a charming, multi-purpose organizer that elevates your small space with both function and flair.
6. DIY Fold-Down Tables for Dining and Work Areas
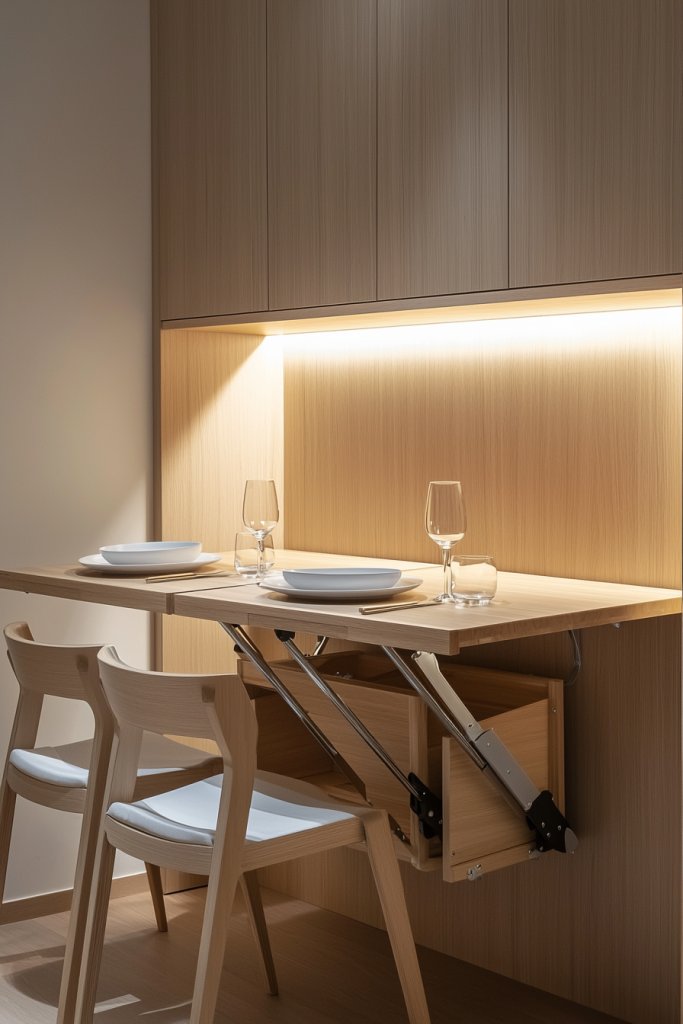
Maximize your small space with a clever fold-down table that transforms your room into a versatile dining or workspace. These space-saving solutions are perfect for tiny apartments or multi-use rooms, giving you a functional surface only when needed.
Imagine a sleek, wooden tabletop with a smooth finish that folds neatly against the wall when not in use. When lowered, it reveals a sturdy support mechanism, often hidden behind a decorative panel or mounted directly to the wall.
The table can be paired with fold-away chairs that tuck underneath, creating an uncluttered look. The overall aesthetic can range from rustic reclaimed wood to modern minimalist designs, with neutral tones like soft beiges or crisp whites that blend seamlessly into small spaces.
The tactile feel is smooth and solid, offering a cozy spot to dine or work without sacrificing style or space. To create your own fold-down table, start by choosing a durable, lightweight wood or plywood for the surface—pine or birch are budget-friendly options.
Attach a sturdy wall-mounted bracket or fold-down hinge system, ensuring it can support the weight of dishes or a laptop. Securely fix the support arm to the wall at an appropriate height, typically waist level, and attach the tabletop using strong screws.
Finish with a protective sealant or paint to match your decor. For added convenience, incorporate a small shelf or hooks nearby for utensils, notebooks, or chargers. This DIY project is achievable for most beginners and offers a stylish, practical upgrade for tiny living.
7. Clever Corner Shelving to Optimize Underutilized Corners
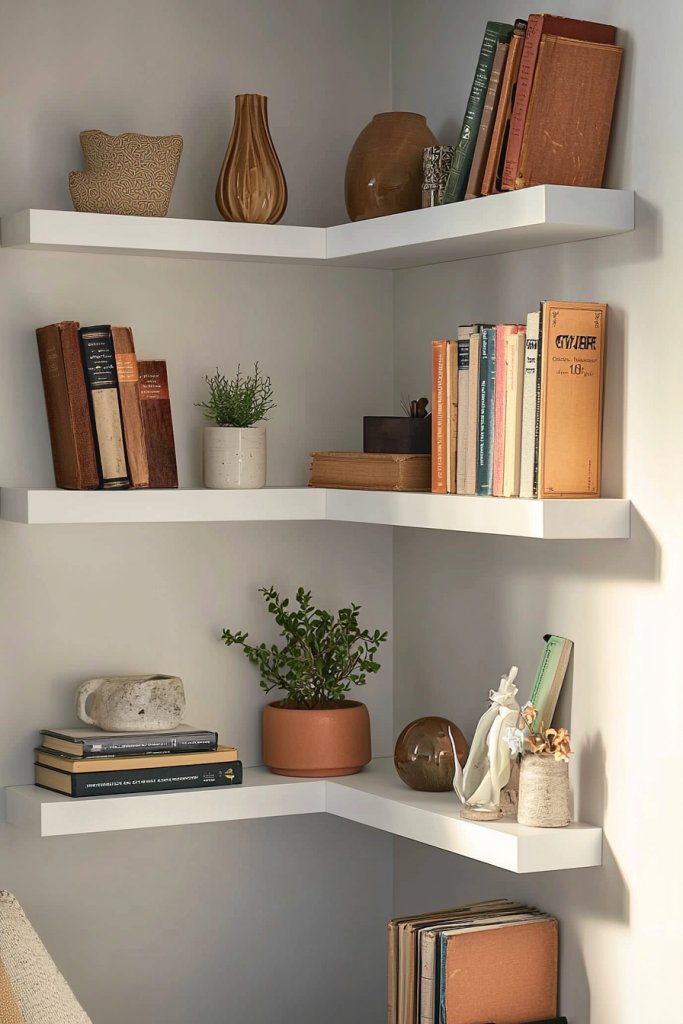
Corners are often overlooked in small rooms, but with smart corner shelving, they can become prime real estate for storage and display. These shelves help eliminate clutter and make the most of every inch, adding both function and visual interest.
Picture a set of three or four floating shelves that snugly fit into a corner, painted in a bright white or soft pastel to brighten the space. The shelves are staggered at different heights, creating a dynamic look, and are filled with decorative baskets, books, or small accents like candles or figurines.
The smooth, clean lines of these shelves contrast beautifully with textured wall paint or wallpaper, making the corner feel intentional rather than wasted space. The overall effect is a cozy nook that appears larger and more organized, with a layered visual depth that draws the eye.
To DIY corner shelving, measure your space carefully and choose lightweight, sturdy materials like mDF, plywood, or reclaimed wood. Cut the shelves to desired lengths, then mount L-brackets or hidden brackets into the wall studs for stability.
For added style, paint or stain the shelves beforehand. Secure the brackets to the wall using appropriate anchors or screws, ensuring they can support your intended items.
Arrange your decorative objects thoughtfully, varying heights and textures for visual interest. These corner shelves are simple to build, take minimal tools, and instantly transform a neglected corner into a charming storage zone.
8. Customized Pegboard Organizers for Cluttering Free Walls
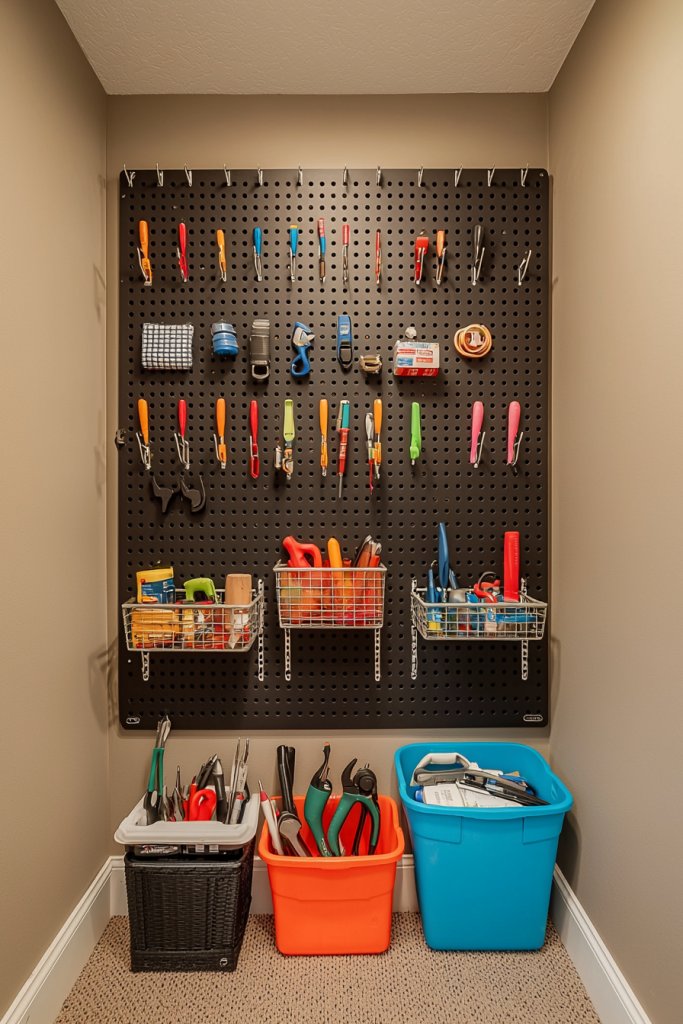
Pegboards offer an adaptable and stylish way to organize small spaces, turning blank walls into efficient storage hubs. They are perfect for keeping everyday essentials within reach while maintaining a tidy, modern look.
Visualize a sleek, matte black or white pegboard mounted on a wall, filled with hooks, baskets, and small shelves holding everything from keys and scissors to craft supplies or kitchen utensils. The grid of evenly spaced holes allows you to customize the arrangement easily, adding or removing accessories as your needs evolve.
The textured surface adds a subtle industrial vibe, while colorful hooks or accessories can inject pops of personality. Overall, the pegboard creates a sense of order and visual interest, making cluttered surfaces a thing of the past.
To DIY a pegboard organizer, purchase a pre-cut sheet of perforated hardboard or metal from a hardware store. Mount it securely to the wall with screws, making sure to anchor into wall studs for stability.
Choose a set of hooks, baskets, and shelves compatible with the pegboard, which are available in various finishes and colors. Arrange your tools or supplies in a way that maximizes accessibility and minimizes visual clutter.
For a more polished look, paint or decorate the pegboard beforehand. This simple project is highly customizable, budget-friendly, and instantly elevates your organization game in small spaces.
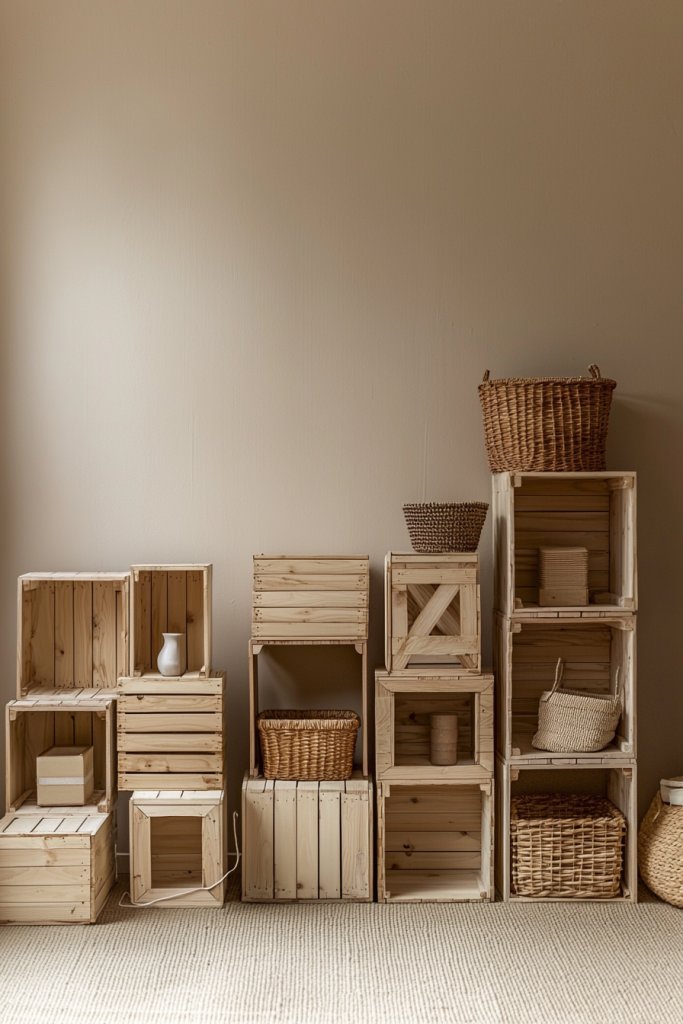
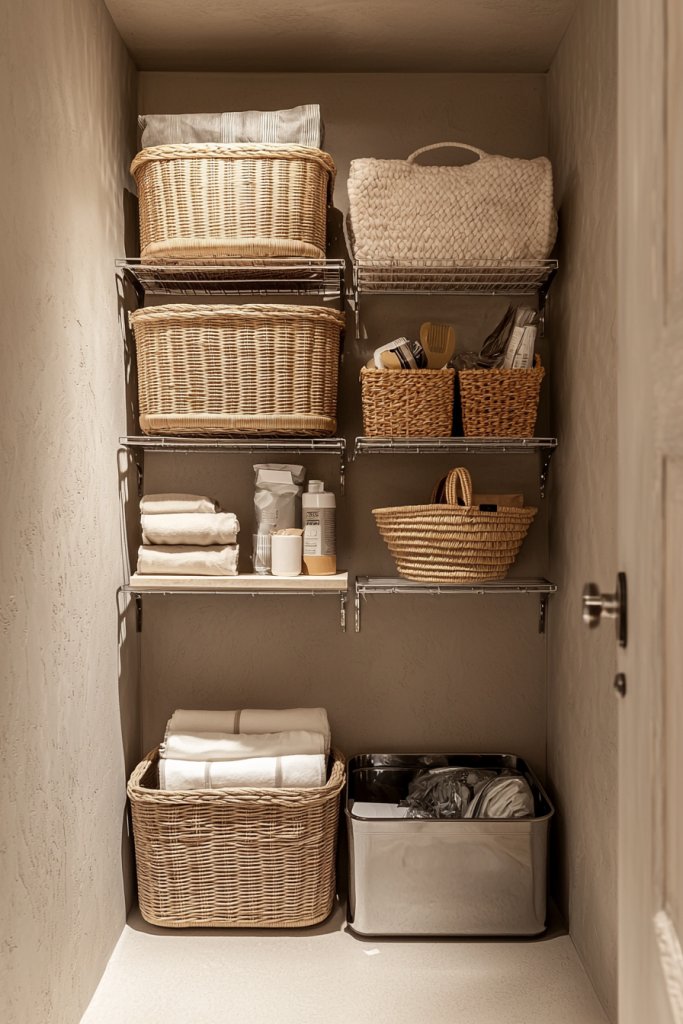
9. Upcycled Crates and Baskets for Compact Storage Solutions
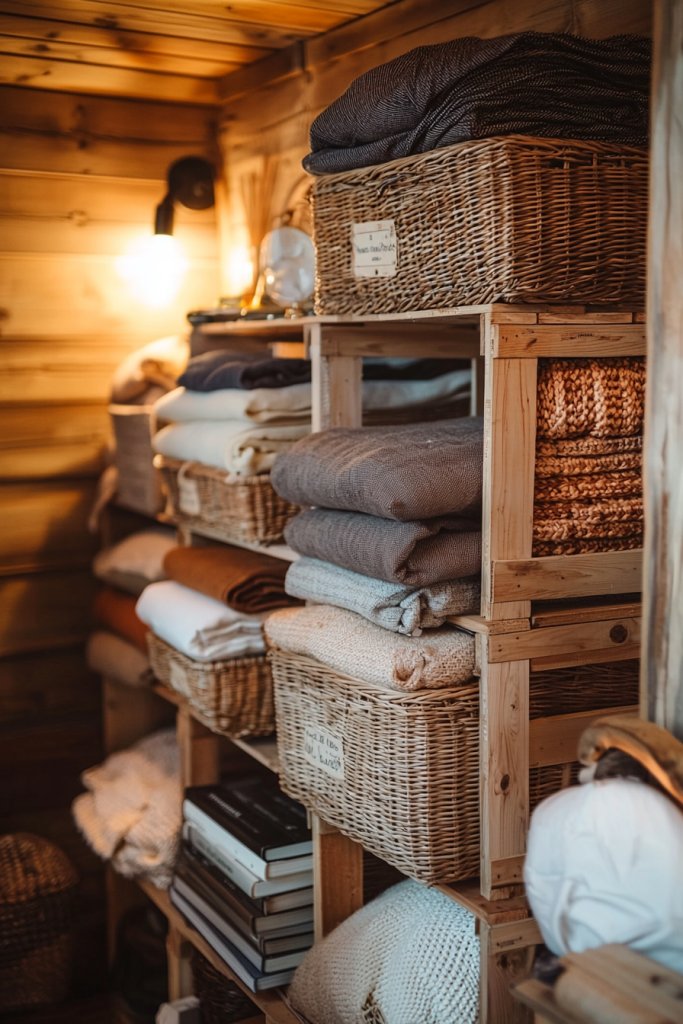
Using upcycled crates and baskets is an eco-friendly way to bring charm and practicality to small rooms. They provide versatile storage that can be moved around easily and styled to match your decor.
Picture a set of wooden shipping crates painted in soft white or pastel shades, stacked neatly to create a mini storage unit. Inside, you might store blankets, books, or toys, while the exterior can be decorated with stencils or fabric liners for a cozy touch.
Wicker or woven baskets, with their natural textures, add warmth and visual interest when placed on shelves or under tables. These containers are lightweight yet sturdy, making them ideal for quick rearrangements or for hiding clutter without sacrificing style.
The mix of textures and colors can create a layered, inviting look that enhances any small space. To DIY with crates or baskets, start by sourcing vintage wooden crates or woven baskets from thrift stores or online marketplaces.
Sand and paint the crates if desired, adding a protective finish for longevity. For baskets, consider lining them with fabric or adding labels for easy identification.
Stack or group your containers in a corner or under a console table for quick access. You can also attach wheels to the bottom for mobility or add hooks to the sides for hanging small items. This approach combines sustainability, affordability, and style, making clutter disappear effortlessly in tight quarters.
10. DIY Curtain or Room Divider to Create Separate Zones
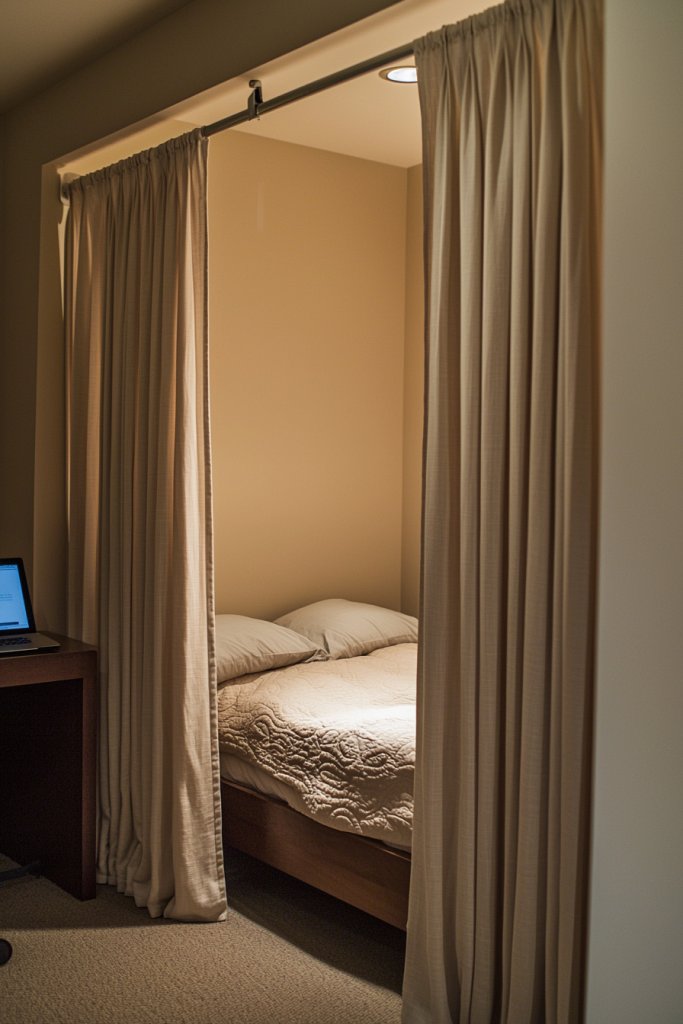
A DIY curtain or room divider offers a flexible, inexpensive way to carve out privacy zones or define different areas within a small room. It’s perfect for multi-purpose spaces where visual separation is desired.
Imagine a flowing, lightweight curtain made of soft linen or sheer fabric in neutral tones like blush, cream, or gray. It hangs from a sleek rod mounted across the ceiling or wall, softly billowing when you walk past.
Alternatively, a foldable or sliding screen made from bamboo, fabric, or lightweight wood panels can create a more structured division. The fabric or panel surface can be decorated with subtle patterns, textures, or even DIY painted designs for a personalized touch.
These dividers add a sense of intimacy and organization without permanently closing off space, making your small room feel larger and more functional. To DIY a curtain divider, select a curtain rod or tension wire and fabric or lightweight material—linen, cotton, or even an old bed sheet—that complements your decor.
Sew or attach the fabric to the rod, ensuring it hangs evenly. For a more permanent solution, you can build a simple frame with wooden dowels or PVC pipes and attach fabric or lightweight panels.
If choosing a foldable screen, repurpose bamboo mats or picture frames covered with fabric or paper. Mount the rod securely and hang your curtain or install the panels, adjusting the setup until it perfectly suits your space. This DIY divider is quick, customizable, and instantly adds privacy and style to small rooms.
11. Using Mirrors to Enhance Light and Create the Illusion of Space
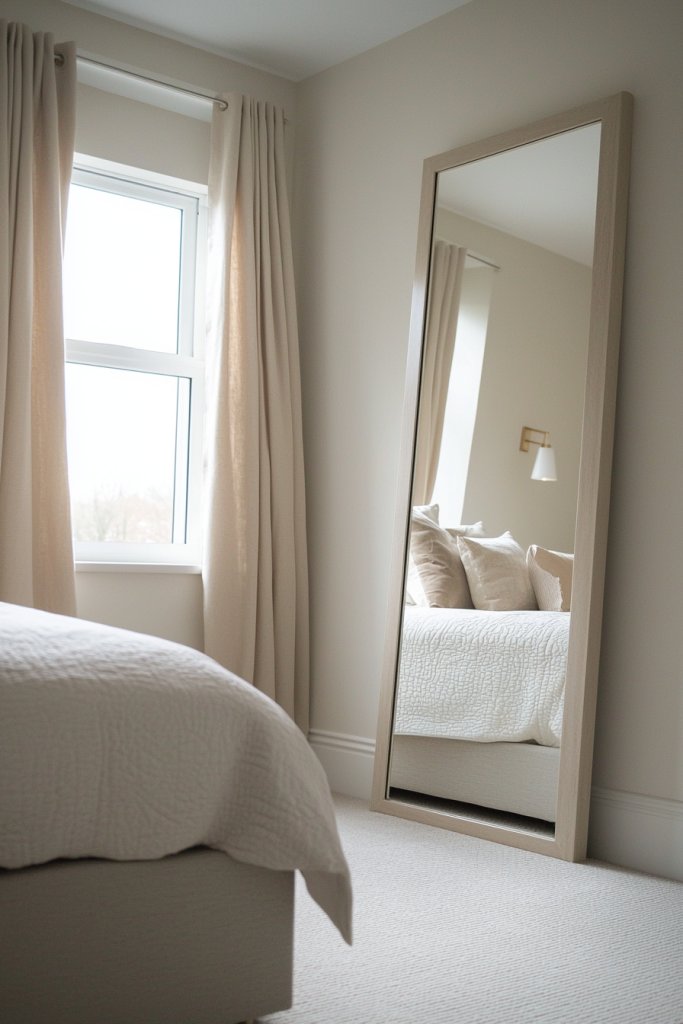
Mirrors are a game-changer for small rooms, turning limited space into a bright, airy retreat. They reflect natural and artificial light, instantly making a room feel larger and more open.
When strategically placed, mirrors can also serve as eye-catching decorative focal points that add depth and dimension. Imagine a sleek, frameless mirror mounted above a narrow console table, reflecting a cozy reading nook with plush cushions and a soft throw.
The mirror’s surface captures the sunlight streaming through a nearby window, bouncing it around the room and illuminating every corner. The space feels more expansive, with the mirror acting as a visual portal.
Its clean edges and minimalist design complement a variety of decor styles, from modern to bohemian, while enhancing the overall brightness and perceived size of the room. To implement this idea, start by choosing a large mirror with a simple frame or a frameless design for versatility.
Hang it opposite a window or near a light source to maximize reflection. You can also lean a mirror against the wall for a casual look—just ensure it’s securely positioned.
For added flair, consider grouping smaller mirrors in geometric arrangements. All you need are basic wall hooks or adhesive strips, making this DIY project accessible and budget-friendly. Whether you’re updating a tiny bedroom or a compact living room, mirrors are an effortless way to boost light and space.
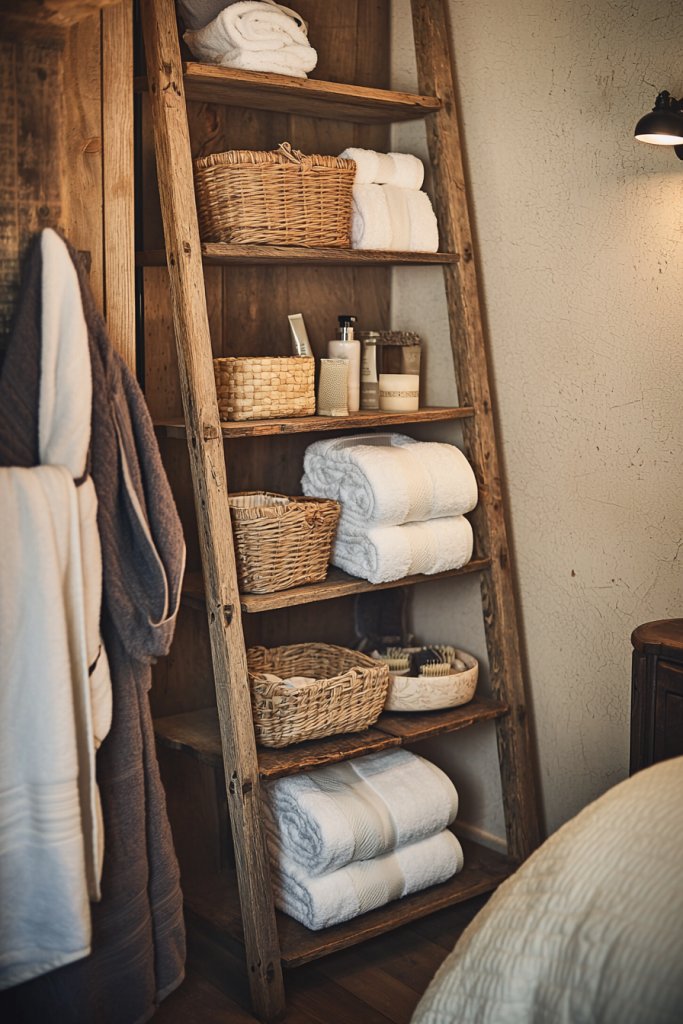
12. Repurposed Ladder Shelves for Tiny Bathrooms or Bedrooms
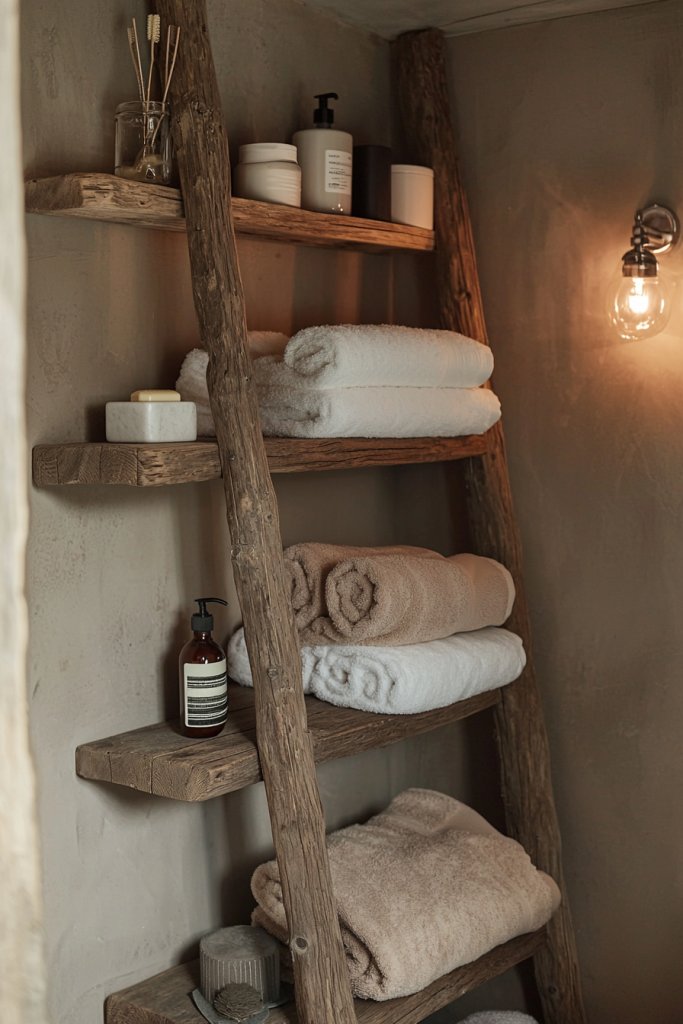
Using a repurposed ladder as a shelving unit combines rustic charm with practical storage, perfect for small bathrooms or bedrooms. This creative DIY idea transforms an ordinary wooden ladder into a multi-tiered organizer that adds visual interest while maximizing vertical space.
Visualize a weathered wooden ladder leaned against a wall, with each rung transformed into a shelf. In a bathroom, it holds neatly folded towels, baskets of toiletries, and decorative jars, all within easy reach.
In a bedroom, it can display cozy throws, books, or decorative ceramics, creating a layered, inviting look. The natural wood texture introduces warmth and character, while the open design keeps the space feeling uncluttered.
The overall aesthetic is relaxed yet functional, blending farmhouse style with modern simplicity, making small spaces feel cozy and curated. To DIY this, select a sturdy wooden ladder or build one using reclaimed wood for a more personalized touch.
Sand and finish it lightly to remove splinters and enhance the wood’s natural grain. Attach non-slip pads on the bottom if placing on a smooth surface.
Use the rungs to stack or arrange baskets, folded textiles, or small decor items—just ensure weight is evenly distributed to maintain stability. This project requires minimal tools: a saw, drill, and some paint or stain if desired. It’s a quick, budget-friendly way to add versatile storage and a charming focal point in tight spaces.
13. DIY Modular Storage Units for Flexible Room Arrangement
Modular storage units are a versatile solution for small rooms, allowing you to customize and rearrange your space as needed. These DIY systems can be built from simple materials and adapt to different layouts, ensuring your storage grows with your needs.
Picture a set of cube-shaped boxes made from plywood or sturdy cardboard, painted in neutral tones like soft gray or creamy white. These cubes stack neatly against the wall or can be separated to create distinct zones, such as a mini closet or display area.
You might include open shelves for easy access or install doors for concealed storage. The modular design encourages creativity—you can add drawers, baskets, or decorative accents to suit your style.
The overall effect is a tidy, organized space that doesn’t feel cramped, with each piece contributing to a cohesive, flexible layout. To create your own, gather materials like plywood or repurposed boxes, along with basic tools such as a saw, drill, and screws.
Paint or decorate the cubes to match your room’s aesthetic. Use connectors like corner brackets or stacking clips for stability, and consider adding wheels for mobility.
For a simpler option, stack sturdy plastic crates or storage bins in a configuration that suits your space. These DIY modular units make it easy to adapt your room’s layout over time, providing functional, customizable storage without sacrificing style.
14. Hidden Niche Decor with Built-In Shelving or Cabinets
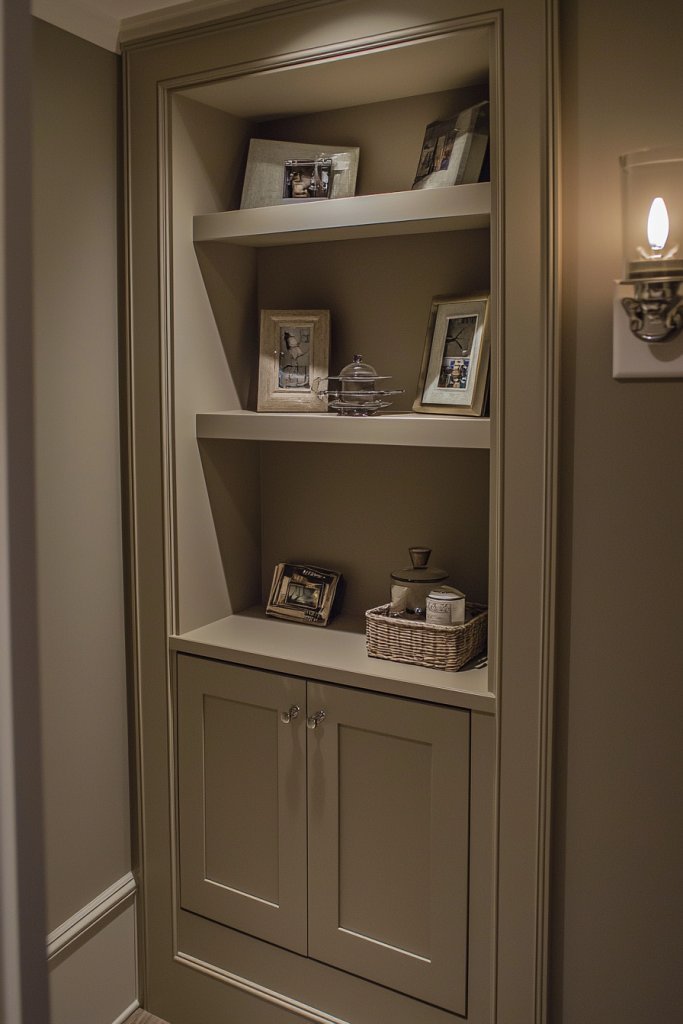
Maximize small spaces by creating hidden niches with built-in shelving or cabinets, seamlessly blending storage with wall design. This clever approach transforms unused wall recesses into elegant storage solutions that keep clutter out of sight while adding architectural interest.
Imagine a small alcove in your living room or bedroom, fitted with sleek, white built-in shelves that hold books, decorative objects, or folded textiles. The shelves are recessed into the wall, making them appear as part of the structure rather than an addition.
The surrounding wall is painted in a soft, neutral tone, emphasizing clean lines and minimalism. This hidden niche creates a sense of depth and sophistication, making the room feel larger and more organized without sacrificing style.
It’s perfect for small apartments where every inch counts, offering a tidy, integrated look that’s both functional and visually appealing. To implement, identify a wall or alcove suitable for a built-in feature.
Use plywood or MDF to construct shelves or cabinets, securing them firmly into wall studs. Finish with paint or veneer for a seamless look.
For a quick DIY, consider installing pre-made modular shelving units that fit into the niche. Make sure to measure carefully and leave enough space for easy access. This subtle yet impactful upgrade adds storage and character, transforming awkward gaps into stylish showcases that enhance your room’s overall aesthetic.
15. Creative Use of Over-the-Door Hooks and Racks

Over-the-door hooks and racks are simple, effective tools to add extra storage and organization without taking up floor space. They’re perfect for small rooms, offering quick access to essentials and helping keep clutter off surfaces.
Picture a sleek metal over-the-door hook holding a collection of lightweight tote bags, scarves, or hats in the entryway. In a bathroom, a rack holds towels or robes, while in a bedroom, it can organize jewelry or belts.
The hooks come in various finishes—matte black, brushed nickel, or antique bronze—complementing different decor styles. The key is choosing sturdy, well-designed hooks that fit your door thickness and weight needs.
This idea adds vertical storage that’s unobtrusive but highly functional, instantly decluttering countertops, floors, or furniture surfaces. To DIY or implement, purchase over-the-door hooks or racks from home improvement stores or online.
For a more customized look, consider attaching adhesive-backed hooks directly to the door or wall using strong double-sided tape or screws. Use hooks with multiple tiers or hooks for different items, and ensure they are rated for the weight you plan to hang. This quick upgrade adds valuable storage and organization, making small spaces feel more open and efficient with minimal effort and cost.
16. Upcycled Pallets for Compact Coffee Tables and Sideboards
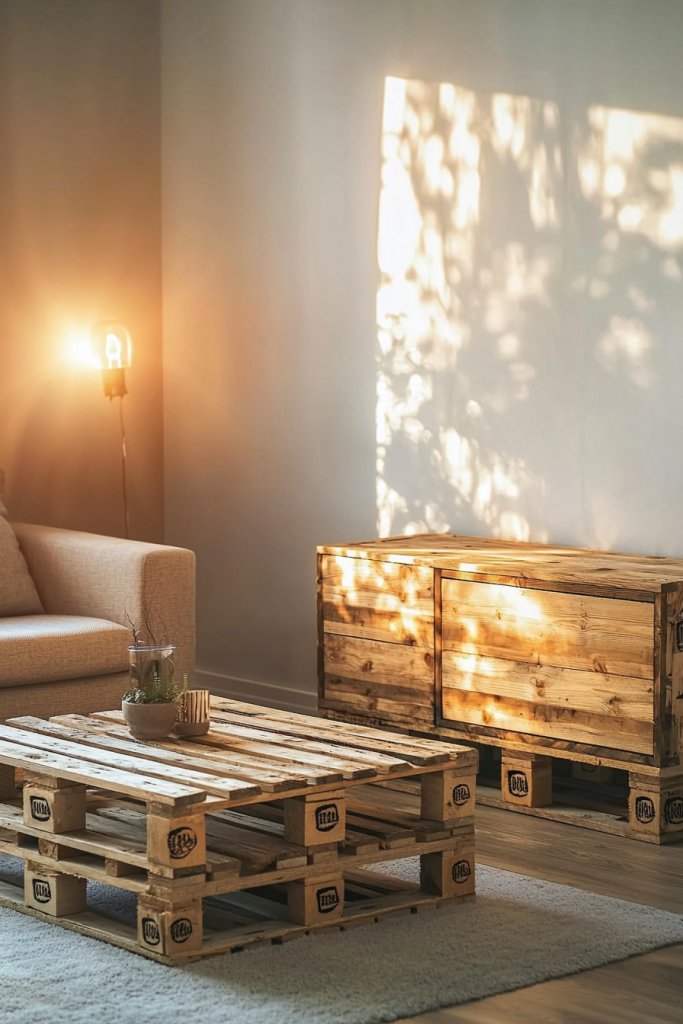
Transforming old pallets into stylish furniture is a fantastic way to add character and functionality to small spaces without breaking the bank. This idea not only recycles materials but also introduces a rustic charm that complements modern minimalism or eclectic decor styles.
Perfect for compact living rooms or cozy nooks, upcycled pallet furniture offers a practical solution that maximizes space while adding visual interest. Imagine a sturdy, low-profile coffee table crafted from a reclaimed wooden pallet, sanded smooth and painted in a soft pastel hue like mint green or blush pink.
The rough-hewn texture of the wood contrasts beautifully with sleek, modern accessories such as a glass vase or ceramic tray. Alternatively, a pallet sideboard with open shelving can hold books, baskets, or decorative objects, creating a layered, inviting look.
The natural wood grain, combined with a matte finish or a splash of bold color, creates a warm, inviting focal point that invites touch and admiration. The textured surface and earthy scent of the wood add sensory richness to the space.
Getting started is straightforward: strip the pallet of any protruding nails or splinters, then sand it down thoroughly. You can opt for a clear sealant to preserve the wood’s rustic charm or paint it in your favorite color for a more polished look.
Attach caster wheels for mobility or add cushions on top for comfort. Use wood stain, non-toxic paint, or chalk paint for customization, and pair your piece with small decorative objects like candles or vintage books to complete the aesthetic. With simple tools like a saw, drill, and brush, this project is accessible even for beginners.
17. DIY Upholstered Storage Ottomans for Seating and Hidden Storage
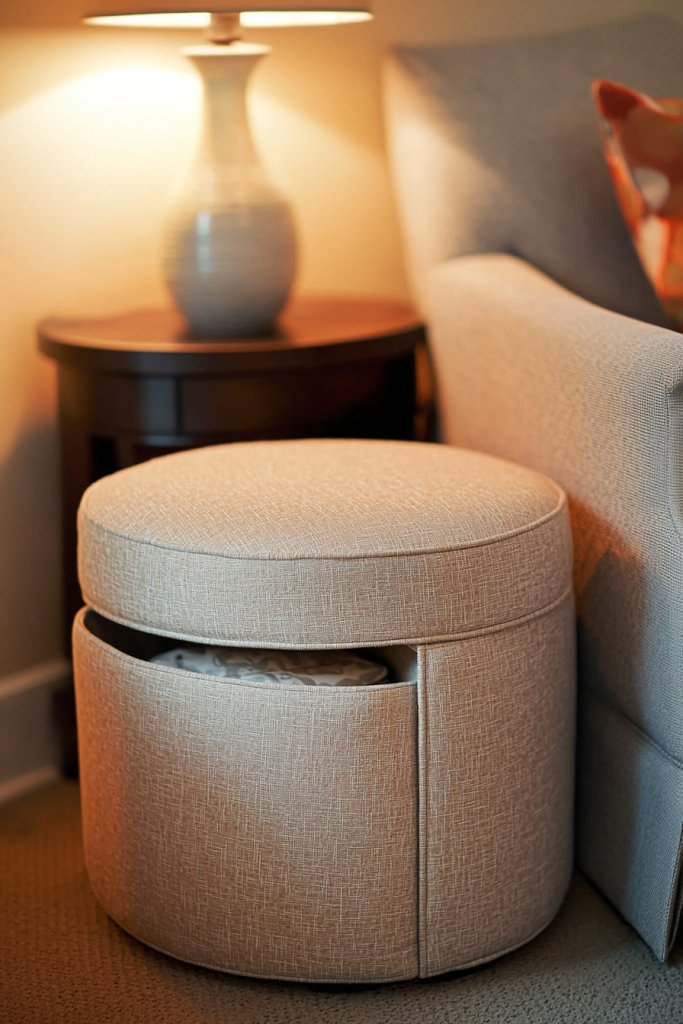
A DIY upholstered storage ottoman is the perfect multifunctional piece for small rooms—serving as extra seating, a footrest, and a discreet storage space. It’s a cozy, inviting addition that helps keep clutter out of sight while adding a plush touch to your decor.
Ideal for compact bedrooms, living rooms, or entryways, it combines comfort with practicality in a stylish package. Picture a soft, rectangular ottoman upholstered in a neutral linen or velvet fabric, with plush cushioning on top.
The exterior is finished with decorative piping or tufted buttons for a tailored look. The interior houses a spacious compartment, accessible via a hinged lid, perfect for stashing blankets, magazines, or shoes.
You might choose a warm taupe, blush pink, or cool gray to match your existing palette, with textures that invite touch—like a chunky knit throw draped over the side or a velvet cushion. The combination of soft textiles and clean lines creates a luxurious yet approachable vibe, making the space feel warm and inviting.
Building your own ottoman involves selecting a sturdy wooden frame or a pre-made storage box, then attaching foam padding and upholstery fabric. You can opt for upholstery-grade linen, velvet, or even faux leather depending on your style and budget.
Sew or staple the fabric around the frame, ensuring smooth, tight corners. For added durability, use foam padding for comfort and hot glue or staples for secure attachment. Finish with decorative details like buttons or trim, and place your new piece in a corner or at the foot of your bed to maximize space and style.
18. Floating Desks and Workstations for Small Home Offices
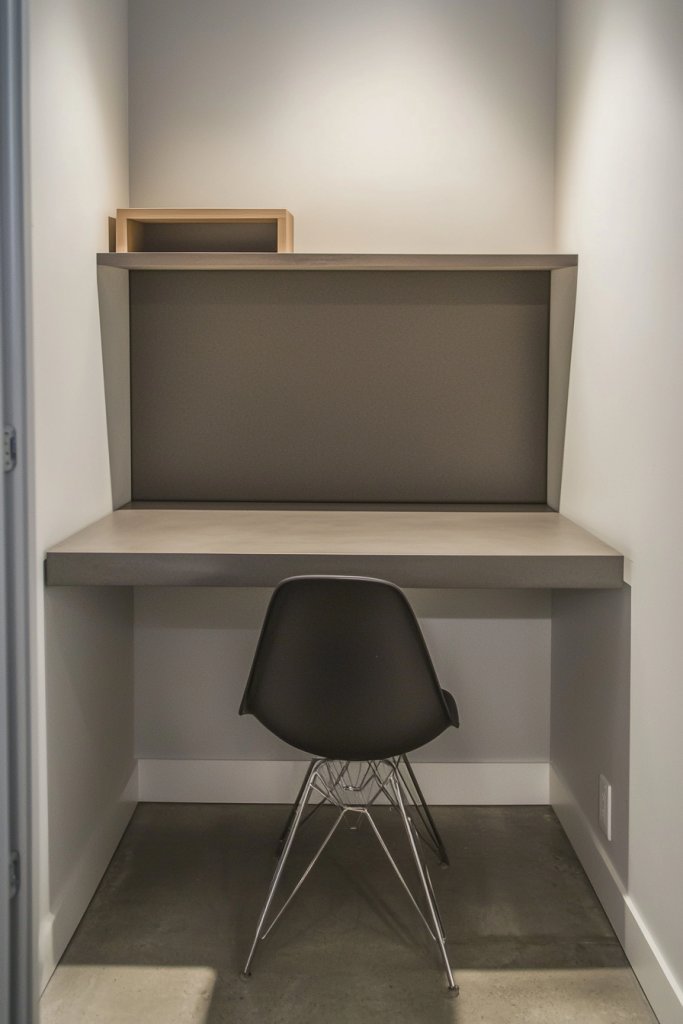
A floating desk creates a sleek, space-saving solution for a functional home office in a small room or corner. It offers ample workspace without bulky furniture, making it perfect for those who need a dedicated but unobtrusive area to work, study, or craft.
With a minimalist aesthetic, floating desks contribute to an open, airy feel—ideal for maximizing limited square footage. Visualize a narrow, wall-mounted surface in a calming color like soft white or muted navy, supported by discreet brackets.
The desk appears to hover, with no legs or bulky frames, giving it a clean, uncluttered look. It’s decorated with a slim laptop, a small stack of notebooks, and a stylish desk lamp, all arranged neatly to emphasize simplicity.
The space underneath remains open, allowing for easy movement or additional storage solutions like wall-mounted shelves or baskets. A light-colored wood or laminate top paired with matte black or metallic brackets creates a modern, understated aesthetic that blends seamlessly into various decor styles.
To implement, start by measuring your available space and selecting a sturdy wood or MDF board cut to your desired length and width. Attach brackets or cleats securely to the wall, then mount the surface, ensuring it’s level and stable.
For added functionality, install wall-mounted shelves or pegboards nearby for additional storage. Use screws, anchors, and a level for proper installation, and finish with a coat of non-toxic paint or sealant if desired. This DIY project is quick, affordable, and highly adaptable—perfect for creating a small but efficient workspace.
19. Decor with Lightweight Textiles and Drapes to Maximize Space
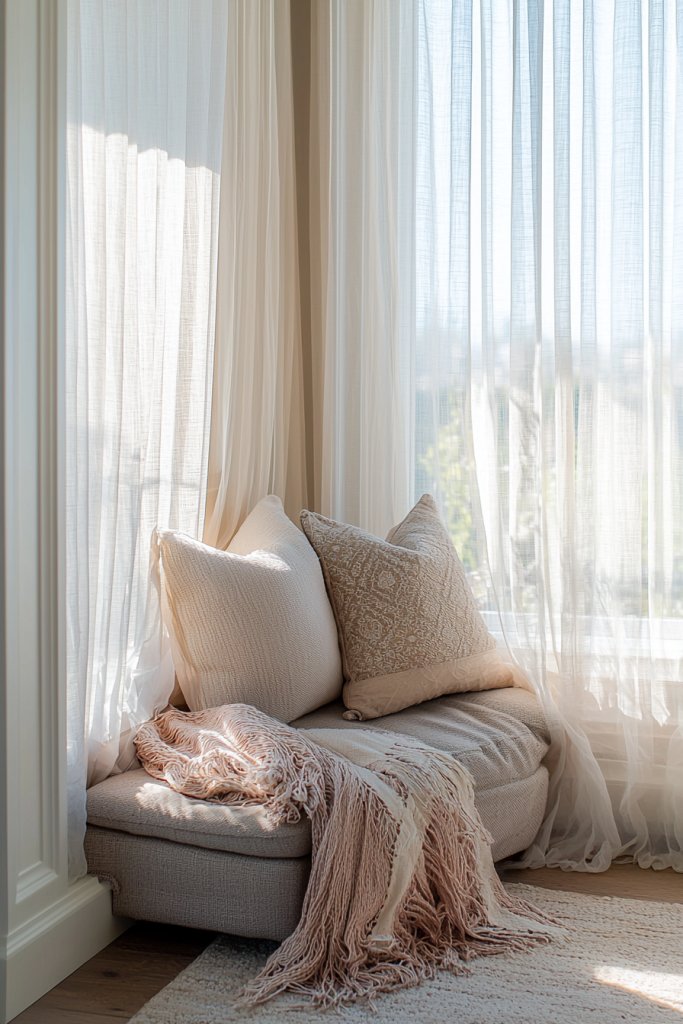
In small rooms, textiles and drapes are powerful tools to define spaces, soften the environment, and add personality without clutter. Lightweight fabrics such as sheer curtains, airy throws, or decorative cushions can visually expand a space while adding comfort and style.
This approach is especially useful when you want to create separate zones or add visual layers without bulky partitions. Imagine a room with floor-to-ceiling sheer curtains in a crisp white or soft blush that gently filter sunlight, making the space feel larger and more open.
Drape a lightweight, textured throw blanket—like a chunky knit or woven linen—over a chair or sofa to add warmth and tactile interest. Use decorative pillows in muted tones or subtle patterns to create cozy, inviting seating areas.
Soft pastel or neutral palettes with natural fibers, such as jute or cotton, evoke calmness and spaciousness. The gentle movement of fabrics in the breeze or as you walk adds a sensory dimension that enhances the room’s inviting vibe.
Implementing this idea is simple: select lightweight, breathable fabrics like linen, voile, or cotton. Hang sheer curtains on existing rods or install tension rods for quick, damage-free solutions.
Drape throws or cushions in complementary colors and textures for added visual interest. Mix and match different textiles to create layered effects, keeping the overall palette cohesive. These simple textile updates can dramatically transform a small space, making it feel airy, cozy, and personalized with minimal effort or cost.
20. Hanging Baskets and Wall-mounted Planters for Decor and Storage (without plants)
Hanging baskets and wall-mounted containers are innovative ways to add storage and decorative flair without taking up valuable floor space. Even in the absence of plants, these versatile elements can hold everything from toiletries and kitchen essentials to decorative objects or cozy throws, transforming bare walls into functional art.
Visualize a series of woven or metal baskets suspended at different heights on a blank wall, creating visual rhythm and texture. They are filled with soft, colorful textiles like folded throws, or arranged with decorative objects such as candles, vintage ceramics, or small sculptures.
Alternatively, sleek wall-mounted bins in matte black or metallic finishes can organize everyday items or display curated collections. The arrangement creates depth and interest, making the wall a focal point while keeping clutter off surfaces.
The textures—woven, ceramic, or metal—add tactile richness, elevating the room’s aesthetic without overwhelming the space. To implement, choose hanging baskets or wall-mounted containers suited to your style—materials like rattan, wire, or painted metal work well.
Install sturdy hooks, brackets, or mounting systems, ensuring they can support the weight of your chosen contents. Fill the baskets with lightweight items like textiles, decorative objects, or small supplies.
Use screws, anchors, and level tools for secure mounting, and consider symmetry or asymmetry for visual interest. These wall-mounted solutions are easy to update and customize, offering a smart way to add personality and storage in small spaces while keeping the floor clear.
21. Personalization with DIY Wall Art and Decorative Accents to Maximize Visual Appeal
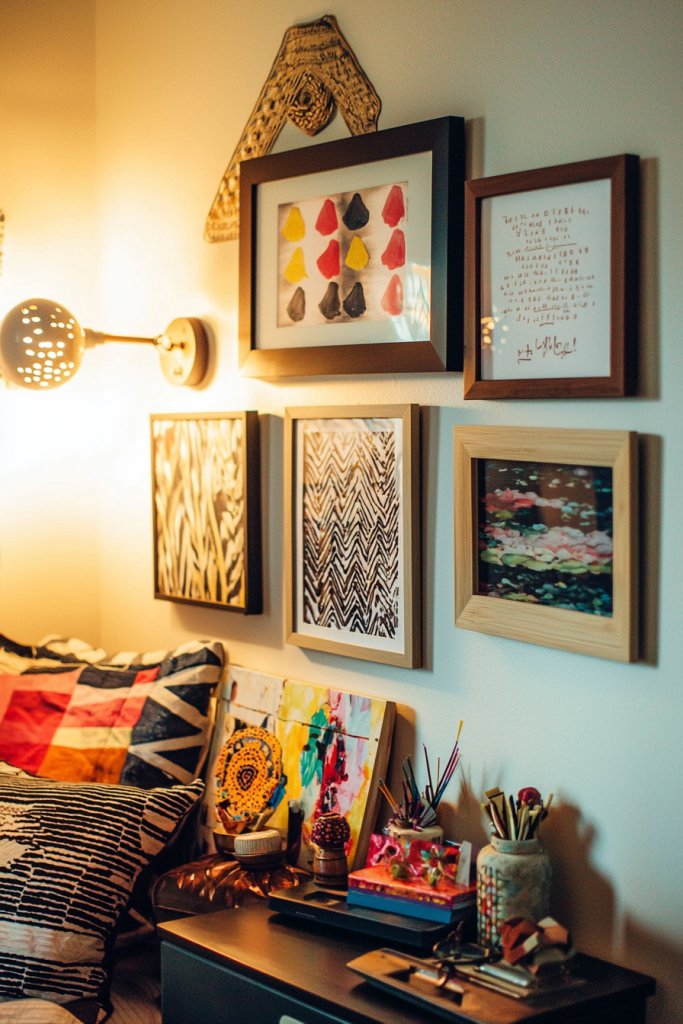
Adding your own touch to your walls can instantly transform a small space into a personalized sanctuary. DIY wall art and decorative accents let you showcase your style while making the room feel more inviting and cohesive—all without overwhelming limited square footage.
Imagine a wall adorned with a gallery of framed quotes on kraft paper, a series of handmade fabric wall hangings in soft blush and cream, or a collection of vintage mirrors with unique frames arranged in a dynamic pattern. These elements create visual interest through textures and colors, from the plushness of woven textiles to the sleek shine of metallic accents.
The room feels warmer and more curated, with each piece telling a part of your story, subtly drawing the eye upward to enhance the perceived height and space. Getting started is simple and budget-friendly.
Gather supplies like a blank canvas, paint, washi tape, or fabric remnants. For example, you could create abstract art with acrylic paints, craft a geometric wall hanging with macramé, or frame meaningful photographs with inexpensive frames.
Arrange your pieces thoughtfully—grouping similar colors or themes—and hang at varying heights for visual rhythm. With a little effort, your walls will become a striking focal point that reflects your personality and maximizes your small space’s visual appeal.
Conclusion
With a wide array of DIY decor ideas—from multi-functional furniture and vertical storage to clever use of mirrors and personalized wall art—there are countless ways to transform small spaces into stylish, functional retreats. These creative solutions empower you to maximize every inch of your home while adding a personal touch that reflects your style.
Don’t hesitate to try these projects and turn your space challenges into opportunities for innovation and beauty. Start small, get creative, and watch your home become both practical and inspiring!
Leave a Reply